Please create an account or Login! Have fun!
Chiller: Difference between revisions
Indyindeed (talk | contribs) m (turns out the wrong decade message was written, thanks andrew b) |
Sharpeye468 (talk | contribs) m (Updated to new level template) |
||
| (5 intermediate revisions by 3 users not shown) | |||
| Line 1: | Line 1: | ||
{{Infobox Level | {{Infobox Level | ||
| | |pack = cc1 | ||
|level = 110 | |level = 110 | ||
| | |image = [[File:Level_110.png|300px]] | ||
| | |||
}} | }} | ||
| Line 25: | Line 9: | ||
Move block 7 to the corner, as one block must be wasted, and press the [[green button]] with block 5, then move block 6 R 3D 2R and pick block 5 back up with a L move. You are now ready to bridge south, but it takes an additional step to get to the block from here, so wait until you arrive U off the block before bridging south. Move block 6 U 4R, then enter the block room from the top and throw block 3 D, block 1 R, block 4 D, and then block 3 4D 6R. Block 6 will now go on the third of five landings which lead to two chips apiece; on this landing, play U from the first chip, then decamp to the landing, collect block 4 and throw it R 4D before bridging to the south area of the level. | Move block 7 to the corner, as one block must be wasted, and press the [[green button]] with block 5, then move block 6 R 3D 2R and pick block 5 back up with a L move. You are now ready to bridge south, but it takes an additional step to get to the block from here, so wait until you arrive U off the block before bridging south. Move block 6 U 4R, then enter the block room from the top and throw block 3 D, block 1 R, block 4 D, and then block 3 4D 6R. Block 6 will now go on the third of five landings which lead to two chips apiece; on this landing, play U from the first chip, then decamp to the landing, collect block 4 and throw it R 4D before bridging to the south area of the level. | ||
Collect both chips in the very southwest, ''one'' chip in the room to the east, move through the [[force floor]]s to pick up a [[blue key]], and ''then'' take the other chip. Run 3U RU L [2] up the eastern corridor, take the chips behind the [[blue lock]] and wait once again for the ball to bounce itself back in. Now, go through the center of this room and up to the start again, and finish collecting the five landings. You can immediately move block 4 6R and block 3 R; shove block 4 onto landing 1 ''without'' following and then circle across the top a second time. Move block 1 2D, block 2 L, block 1 5D 7R, and follow block 3 off landing 5 to two more chips. Proceed with landing 2 by using block 1, collect the unfinished landing 1, and then finally collect the last block from the top side and finish landing 4. Play U from the chip, because R is a [[bomb]] | Collect both chips in the very southwest, ''one'' chip in the room to the east, move through the [[force floor]]s to pick up a [[blue key]], and ''then'' take the other chip. Run 3U RU L [2] up the eastern corridor, take the chips behind the [[blue lock]] and wait once again for the ball to bounce itself back in. Now, go through the center of this room and up to the start again, and finish collecting the five landings. You can immediately move block 4 6R and block 3 R; shove block 4 onto landing 1 ''without'' following and then circle across the top a second time. Move block 1 2D, block 2 L, block 1 5D 7R, and follow block 3 off landing 5 to two more chips. Proceed with landing 2 by using block 1, collect the unfinished landing 1, and then finally collect the last block from the top side and finish landing 4. Play U from the chip, because R is a [[bomb]]. The [[exit]] is at the start of the level. | ||
==Decade message== | ==Decade message== | ||
| Line 32: | Line 16: | ||
== Trivia == | == Trivia == | ||
* Chiller is the only CC1 level in the original [[Lynx]] version where [[Chip]] can touch the borders of the [[grid]]; this is done by catching the second block pushed onto landing 4 and exploding the [[bomb]] at (31, 6). It has been speculated that Chip could possibly wrap around to the other side of the grid in Lynx, which would explain why borders were originally instituted in CC1, but there is no proof as (0, 6) is a [[wall]] tile. <!-- Has this been proven? Does anything different happen without the wall? --> [[Tyler Sontag]] captured the video [http://www.youtube.com/watch?v=DaDVwsG4-x4 here.] | * Chiller is the only CC1 level in the original [[Lynx ruleset|Lynx]] version where [[Chip]] can touch the borders of the [[grid]]; this is done by catching the second block pushed onto landing 4 and exploding the [[bomb]] at (31, 6). It has been speculated that Chip could possibly wrap around to the other side of the grid in Lynx, which would explain why borders were originally instituted in CC1, but there is no proof as (0, 6) is a [[wall]] tile. <!-- Has this been proven? Does anything different happen without the wall? --> [[Tyler Sontag]] captured the video [http://www.youtube.com/watch?v=DaDVwsG4-x4 here.] | ||
==Full level map== | ==Full level map== | ||
[[ | [[File:Cc1_full_map_level_110.png|500px]] | ||
== Walkthrough == | == Walkthrough == | ||
Latest revision as of 04:23, 30 April 2020

| |
| Level set | Chip's Challenge 1 |
|---|---|
| Level number | 110 |
| Designer | Unknown |
| Password | XBAO |
| Chips | 16 required / 16 available |
| Time limit | 399 |
| MS (Scores) | |
| Bold time | 277 |
| Public time | 276 |
| Casual difficulty | ***** |
| Bold execution difficulty |
***** |
| Bold routing difficulty |
***** |
| Bold luck difficulty |
***** |
| Lynx (Scores) | |
| Bold time | 270 |
| Public time | 268 |
| Casual difficulty | ***** |
| Bold execution difficulty |
***** |
| Bold routing difficulty |
***** |
| Bold luck difficulty |
***** |
| Steam (Scores) | |
| Bold time | 270 |
| Public time | 267 |
| Casual difficulty | ***** |
| Bold execution difficulty |
***** |
| Bold routing difficulty |
***** |
| Bold luck difficulty |
***** |
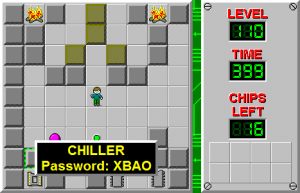
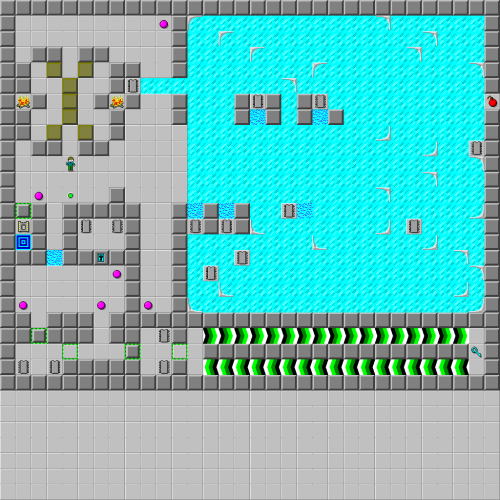
Chiller is the 110th level in Chip's Challenge 1. It is quite a complex level in its unassuming boundaries; Chip must collect items from unpredictable bouncing pink balls, work out a block puzzle, and also move the blocks through a frozen lake on the right. There are seven blocks in the X above, which will be numbered in forwards reading order.
Move block 7 to the corner, as one block must be wasted, and press the green button with block 5, then move block 6 R 3D 2R and pick block 5 back up with a L move. You are now ready to bridge south, but it takes an additional step to get to the block from here, so wait until you arrive U off the block before bridging south. Move block 6 U 4R, then enter the block room from the top and throw block 3 D, block 1 R, block 4 D, and then block 3 4D 6R. Block 6 will now go on the third of five landings which lead to two chips apiece; on this landing, play U from the first chip, then decamp to the landing, collect block 4 and throw it R 4D before bridging to the south area of the level.
Collect both chips in the very southwest, one chip in the room to the east, move through the force floors to pick up a blue key, and then take the other chip. Run 3U RU L [2] up the eastern corridor, take the chips behind the blue lock and wait once again for the ball to bounce itself back in. Now, go through the center of this room and up to the start again, and finish collecting the five landings. You can immediately move block 4 6R and block 3 R; shove block 4 onto landing 1 without following and then circle across the top a second time. Move block 1 2D, block 2 L, block 1 5D 7R, and follow block 3 off landing 5 to two more chips. Proceed with landing 2 by using block 1, collect the unfinished landing 1, and then finally collect the last block from the top side and finish landing 4. Play U from the chip, because R is a bomb. The exit is at the start of the level.
Decade message[edit]
After exiting, the next decade message is now given:
Chip can't wait to join the Bit Busters! The club's already figured out the school's password and accessed everyone's grades!
Trivia[edit]
- Chiller is the only CC1 level in the original Lynx version where Chip can touch the borders of the grid; this is done by catching the second block pushed onto landing 4 and exploding the bomb at (31, 6). It has been speculated that Chip could possibly wrap around to the other side of the grid in Lynx, which would explain why borders were originally instituted in CC1, but there is no proof as (0, 6) is a wall tile. Tyler Sontag captured the video here.
Full level map[edit]
Walkthrough[edit]
| Previous Level | Current Level | Next Level |
|---|---|---|
| ← Torturechamber | Chiller | Time Lapse → |
- Chip's Challenge 1 Levels
- Levels by unknown designers
- Levels with casual difficulty 3 (MS)
- Levels with bold execution difficulty 1 (MS)
- Levels with bold routing difficulty 2 (MS)
- Levels with casual difficulty 3 (Lynx)
- Levels with bold execution difficulty 1 (Lynx)
- Levels with bold routing difficulty 2 (Lynx)
- Levels with casual difficulty 3 (Steam)
- Levels with bold execution difficulty 1 (Steam)
- Levels with bold routing difficulty 2 (Steam)
