Please create an account or Login! Have fun!
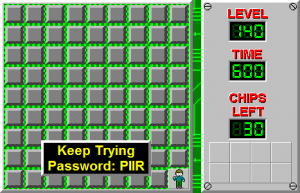
Keep Trying

| |
| Level set | Chip's Challenge Level Pack 2 |
|---|---|
| Level number | 140 |
| Designer | Eric Schmidt |
| Password | PIIR |
| Hint | Wow! You made it this far?! |
| Chips | 30 required / 30 available |
| Time limit | 600 |
| MS (Scores) | |
| Melinda time | 491 |
| Bold time | 484 |
| Public time | 484 |
| Casual difficulty | ***** |
| Bold execution difficulty |
***** |
| Bold routing difficulty |
***** |
| Bold luck difficulty |
***** |
| Lynx (Scores) | |
| Bold time | 462 |
| Public time | 470 |
| Casual difficulty | ***** |
| Bold execution difficulty |
***** |
| Bold routing difficulty |
***** |
| Bold luck difficulty |
***** |
Keep Trying is the 140th level in Chip's Challenge Level Pack 2. As indicated, Chip will run into a lot of deadly obstacles while playing Keep Trying. A time limit was not specified in the original level, but the addition of one makes Keep Trying one of the hardest bolds currently in existence, due to the long random force floor section at the end. Since this article was first written, the bold time has risen from 480 to 484. To see the 484 route, check the public TWS.
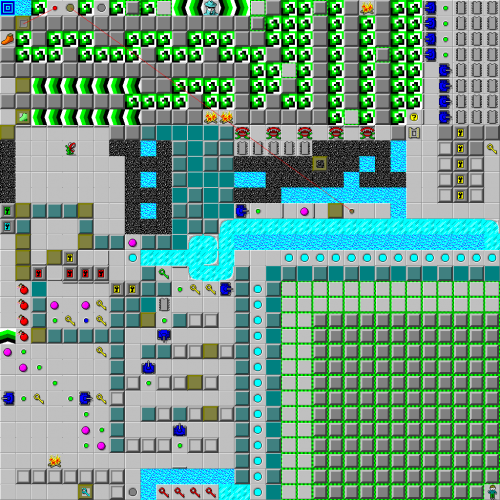
The first thing of note is that this route requires odd step. Run west and teleport >LU, and Chip will arrive at four red keys. Retreat >RL to reach their locks, steal the three yellow keys from the pink balls, and move to the single yellow lock to the north to collect a block and move it into the teleport. Wait [2] and follow it to the red key corridor, which produces a secret route to the top.
Move through the tank maze to the right, take the chip and green key, wait [4] and take the yellow keys, and retreat back out to the pink balls on the left. Climb the east wall: 3U [3] 4U for two keys; in the southwest is a blue key under a block, which can only be taken from the southwest corner. Run 2D 4L 2D 2L and then collect it, then run across the extreme west, through the two locks on the left, to a teeth's lair. Using this odd step route, dart 3U 9R 2U into a blue wall maze and 2R 3D R 2D 2R U out of it.
To collect the five chips from the teeth, Chip has to walk to the right and separate them, so he can collect them from right to left. Walk to the far right column, then 2L DU 2L [1] 3L to collect all the chips. Note that the DU move is used instead of [2] because this moves the block D, allowing Chip to walk back through the gravel to the northeast quicker. Open all the locks on the far right side (no further keys are required), then move across the extreme right and zigzag through the chips downwards to pass into the socket.
Fit through the next three toggle walls, then turn to the south and move west. Chip should get to the fourth toggle wall at about 518.6; at the end are fire boots, which should be collected by about 515.5, and Chip should be able to go back to toggle wall 4 at about 512 or 510. Chip should escape entirely at about 509.0, and should reach [24, 11] at 508.0 or earlier. 508.2 is optimum, but 508.0 will allow Chip to pass the tank with one move less to work with in the far west section, with a slightly lower chance of reaching the bold.
At this point, distinctions should be made between the many different routes through this level. The currently directed route is the 481 route; the AVI contains a route to 477, which is slightly behind the route for 479. The reason why the AVI remains at 477 is because it is much harder to perform the route in MS: noticably different strategies would have to be used based on events occurring within tenths of seconds. In all routes except the 481, do not wait for the tank after taking the green key; the toggle wall pattern is slightly different for the 481. Also, in the 479 route, hit one extra button in the [3] wait. In the 480 route, do not perform this, and come to the gravel at 506.8. More on this route will be seen later.
These many separate routes are a result of a laboratory struggle to maximize the efficiency of moving through each toggle wall at the correct intervals, as directed by the numerous random force floors, by subtly changing the poly-rhythm of green buttons in places such as the tank ladder and the southwest area. Andrew Bennett began this, boring the previous record of 476 out to 477, 479, and 480 by using both this and several overlooked time-savers in non-random sections. Eventually, J.B. Lewis took this one step further to 481, then several years later returned to grind out a 483 followed by a 484. The reason that the Melinda time is currently unknown is because of the changes to the non-random areas; the most reasonable assumption of the Melinda time with current knowledge is 491.
Now, go back to the block on the gravel and move it D, meanwhile listening to the bouncing tank to the left; when the blue wall was removed, the tank will now bounce like a pink ball would in this situation. It takes 6 moves for Chip to hold the brown button down, and if a 6-move wait would lessen the wait for the tank, do it now; otherwise, deal with the button later. What to do depends on the current state of the level. For 481 and 477, Chip should go to the button, and for 480 and 479 Chip should leave it.
Sneak past the tank, turn to the north and open the first wall under the fire, then move through these floors and turn down to collect the suction boots. The 481 route was an almost completely perfect run to the suction boots; the chance of this area being perfect is 1/809. Now, come back out past the tank, then hit the green button one extra time, hold the brown button down if Chip hadn't before, and follow back through the force floor area and through the top two toggle walls, which will hold Chip up noticeably less than if he didn't touch the button.
Fix for Lynx[edit]
As if the random force floors are not troublesome enough in MS, they also render Keep Trying unsolvable in Lynx. In Lynx, there is no randomness involved in traversing the sections with these directional force floors, so any significant movement comes from overriding them appropriately. However, overrides are not possible twice in a row, nor in the exact opposite direction that the floor is trying to force upon Chip. As a result, the corridor leading to the suction boots is inaccessible. If Chip is pushed from (9, 6) to (8, 6) involuntarily, the floor will next try to force him north, so he is not able to override to the south. If Chip overrides the floor at (9, 6) westward onto (8, 6) the next direction must be forced, but for this to happen southward the override must have been against an eastward force, which again is not possible.
For CCLXP2, a bug was added to the lower-right corner circling a directional force floor; this not only changes the direction every [3], thus making the directional force floors more unpredictable, but also allows passage through the corridor leading through the suction boots.
Full level map[edit]
Walkthrough[edit]
| Previous Level | Current Level | Next Level |
|---|---|---|
| ← Frostbite | Keep Trying | Oracle II → |
- Chip's Challenge Level Pack 2 Levels
- Levels designed by Eric Schmidt
- Levels with casual difficulty 3 (MS)
- Levels with bold execution difficulty 3 (MS)
- Levels with bold routing difficulty 3 (MS)
- Levels with luck rating 5 (MS)
- Levels with casual difficulty 3 (Lynx)
- Levels with bold execution difficulty 5 (Lynx)
- Levels with bold routing difficulty 4 (Lynx)
- Levels unsolvable in Lynx
