Please create an account or Login! Have fun!
Skelzie: Difference between revisions
Sharpeye468 (talk | contribs) m (Updated to new level template) |
(make less ms-centric, mention change from lynx level) |
||
| Line 5: | Line 5: | ||
}} | }} | ||
'''Skelzie''' is the 127th level in [[Chip's Challenge 1]] | '''Skelzie''' is the 127th level in [[Chip's Challenge 1]]. | ||
==454== | == Version differences == | ||
The [[MSCC]] version expands the central room north and south by a tile, adding two extra rows of floor. | |||
==[[MS]] 454 route== | |||
Unlike any other level in [[Chip's Challenge 1|CC1]] or [[Chip's Challenge Level Pack 2|CCLP2]], Skelzie's MS [[bold]] can only be scored in MSCC; the [[Twice Step Glitch]] it relies on is not implemented in [[Tile World]]. In Tile World, 453 (the first and simpler solution) is the most that can be obtained, explained below. This solution requires significantly more accurate timing and the application of the Twice Step Glitch. | |||
Step out of the way either L or R, then >[3:UD U] to a [[red key]], >D back to the start, and then [1/2] *U, clicking on [[trap]] 2 in this room, which will cause the glitch to trigger: If the player clicks on a teleport, it can make Chip "skip" an occupied teleport (the [1/2] wait allowed one of the [[pink ball]]s to occupy the teleport) and move to the next one instead. This allows Chip to slide down out of the teleport in the red key's room rather than back to the red key's location again. Swap the keys until Chip reaches the [[green button]] and chip, then re-enter the teleports with >DUD LU and >[3:RL]. Now, click *R in the same spot, which is now U 2R off Chip, which will cause Chip to first slide >R and then >L, activating the glitch again on the latter move since Chip's >L move is still under control of the mouse. Continue to teleport >[4:RL R] and now [1/2] >L to avoid a collision, and then play DR 2D to exit the level. | Step out of the way either L or R, then >[3:UD U] to a [[red key]], >D back to the start, and then [1/2] *U, clicking on [[trap]] 2 in this room, which will cause the glitch to trigger: If the player clicks on a teleport, it can make Chip "skip" an occupied teleport (the [1/2] wait allowed one of the [[pink ball]]s to occupy the teleport) and move to the next one instead. This allows Chip to slide down out of the teleport in the red key's room rather than back to the red key's location again. Swap the keys until Chip reaches the [[green button]] and chip, then re-enter the teleports with >DUD LU and >[3:RL]. Now, click *R in the same spot, which is now U 2R off Chip, which will cause Chip to first slide >R and then >L, activating the glitch again on the latter move since Chip's >L move is still under control of the mouse. Continue to teleport >[4:RL R] and now [1/2] >L to avoid a collision, and then play DR 2D to exit the level. | ||
| Line 13: | Line 19: | ||
Note that the AVI places the original click 2U 2R from the teleport, so the player doesn't have to move the mouse for the second click. The Twice Step Glitch, and for that manner the [[Mouse Panel Glitch]], will work no matter how far away the mouse is clicked, as long as the sides of the rectangle are not equal; if the player clicks 3R 2U from Chip, it has the same effect as if it were 2R U. However, a 2R 2U click would be read as *U rather than *R (the rule of [[teeth]] applying again), and to [[flick]] a block U while Chip moves R. | Note that the AVI places the original click 2U 2R from the teleport, so the player doesn't have to move the mouse for the second click. The Twice Step Glitch, and for that manner the [[Mouse Panel Glitch]], will work no matter how far away the mouse is clicked, as long as the sides of the rectangle are not equal; if the player clicks 3R 2U from Chip, it has the same effect as if it were 2R U. However, a 2R 2U click would be read as *U rather than *R (the rule of [[teeth]] applying again), and to [[flick]] a block U while Chip moves R. | ||
==453== | ==[[MS]] 453 route== | ||
At the start, dodge the [[pink ball]] by moving either left or right, then >[3: UD U] to obtain the [[red key]]. Then, move >DU, and step LD to switch [[teleport]] directions. Slide >[4:RL], and switch directions again by stepping DR. Slide >[3:UD] and exit the room through the [[recessed wall]]. If done correctly, there should be 6 chips remaining at this point. | At the start, dodge the [[pink ball]] by moving either left or right, then >[3: UD U] to obtain the [[red key]]. Then, move >DU, and step LD to switch [[teleport]] directions. Slide >[4:RL], and switch directions again by stepping DR. Slide >[3:UD] and exit the room through the [[recessed wall]]. If done correctly, there should be 6 chips remaining at this point. | ||
| Line 22: | Line 28: | ||
==Full level map== | ==Full level map== | ||
This is the MSCC version of the level. In other versions, the central room is a perfect square, and the diagonal walls exactly meet its corners. | |||
[[File:Cc1_full_map_level_127.png|500px]] | [[File:Cc1_full_map_level_127.png|500px]] | ||
Latest revision as of 04:05, 6 May 2021

| |
| Level set | Chip's Challenge 1 |
|---|---|
| Level number | 127 |
| Designer | Unknown |
| Password | JMWZ |
| Chips | 21 required / 21 available |
| Time limit | 500 |
| MS (Scores) | |
| Melinda time | 455 |
| Bold time | 454 |
| Public time | 454 |
| Casual difficulty | ***** |
| Bold execution difficulty |
***** |
| Bold routing difficulty |
***** |
| Bold luck difficulty |
***** |
| Mouse Required | Note: This level's bold route requires use of the mouse. |
| Lynx (Scores) | |
| Bold time | 442 |
| Public time | 442 |
| Casual difficulty | ***** |
| Bold execution difficulty |
***** |
| Bold routing difficulty |
***** |
| Bold luck difficulty |
***** |
| Steam (Scores) | |
| Bold time | 442 |
| Public time | 442 |
| Casual difficulty | ***** |
| Bold execution difficulty |
***** |
| Bold routing difficulty |
***** |
| Bold luck difficulty |
***** |
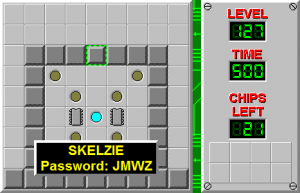
Skelzie is the 127th level in Chip's Challenge 1.
Version differences[edit]
The MSCC version expands the central room north and south by a tile, adding two extra rows of floor.
MS 454 route[edit]
Unlike any other level in CC1 or CCLP2, Skelzie's MS bold can only be scored in MSCC; the Twice Step Glitch it relies on is not implemented in Tile World. In Tile World, 453 (the first and simpler solution) is the most that can be obtained, explained below. This solution requires significantly more accurate timing and the application of the Twice Step Glitch.
Step out of the way either L or R, then >[3:UD U] to a red key, >D back to the start, and then [1/2] *U, clicking on trap 2 in this room, which will cause the glitch to trigger: If the player clicks on a teleport, it can make Chip "skip" an occupied teleport (the [1/2] wait allowed one of the pink balls to occupy the teleport) and move to the next one instead. This allows Chip to slide down out of the teleport in the red key's room rather than back to the red key's location again. Swap the keys until Chip reaches the green button and chip, then re-enter the teleports with >DUD LU and >[3:RL]. Now, click *R in the same spot, which is now U 2R off Chip, which will cause Chip to first slide >R and then >L, activating the glitch again on the latter move since Chip's >L move is still under control of the mouse. Continue to teleport >[4:RL R] and now [1/2] >L to avoid a collision, and then play DR 2D to exit the level.
Note that the AVI places the original click 2U 2R from the teleport, so the player doesn't have to move the mouse for the second click. The Twice Step Glitch, and for that manner the Mouse Panel Glitch, will work no matter how far away the mouse is clicked, as long as the sides of the rectangle are not equal; if the player clicks 3R 2U from Chip, it has the same effect as if it were 2R U. However, a 2R 2U click would be read as *U rather than *R (the rule of teeth applying again), and to flick a block U while Chip moves R.
MS 453 route[edit]
At the start, dodge the pink ball by moving either left or right, then >[3: UD U] to obtain the red key. Then, move >DU, and step LD to switch teleport directions. Slide >[4:RL], and switch directions again by stepping DR. Slide >[3:UD] and exit the room through the recessed wall. If done correctly, there should be 6 chips remaining at this point.
Swap items to reach the green button and re-enter the teleports through the open toggle wall. Slide >[3:DU], switch directions by stepping LD, and finish by sliding >[4:LR]. Move DRDD to the exit.
With very good luck, a blob can press the toggle button for Chip saving [4] on this route, raising the time to a 454. This can be seen at the public TWS, or as the last video on the page.
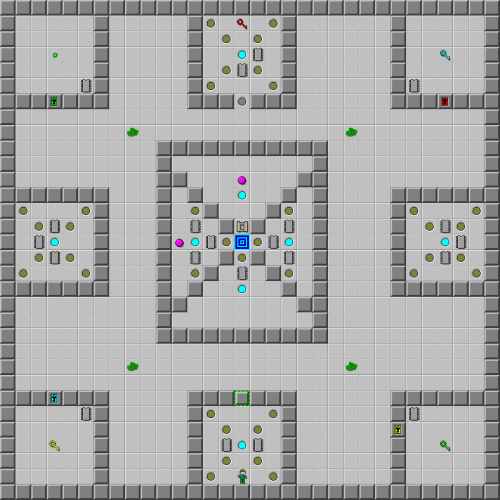
Full level map[edit]
This is the MSCC version of the level. In other versions, the central room is a perfect square, and the diagonal walls exactly meet its corners.
Walkthrough[edit]
| Previous Level | Current Level | Next Level |
|---|---|---|
| ← Block N Roll | Skelzie | All Full → |
- Chip's Challenge 1 Levels
- Levels by unknown designers
- Levels with casual difficulty 3 (MS)
- Levels with bold execution difficulty 5 (MS)
- Levels with bold routing difficulty 3 (MS)
- Levels with luck rating 2 (MS)
- Levels with casual difficulty 3 (Lynx)
- Levels with bold execution difficulty 3 (Lynx)
- Levels with bold routing difficulty 2 (Lynx)
- Levels with luck rating 2 (Lynx)
- Levels with casual difficulty 3 (Steam)
- Levels with bold execution difficulty 3 (Steam)
- Levels with bold routing difficulty 2 (Steam)
- Levels with luck rating 2 (Steam)
