Please create an account or Login! Have fun!
Traps II: Difference between revisions
(Added full level map) |
Indyindeed (talk | contribs) mNo edit summary |
||
| Line 3: | Line 3: | ||
|image = [[Image:CCLP2 Level 40.png|300px]] | |image = [[Image:CCLP2 Level 40.png|300px]] | ||
|levelset = [[Chip's Challenge Level Pack 2]] | |levelset = [[Chip's Challenge Level Pack 2]] | ||
|designer = [[Dave Borgman]] | |||
|level = 40 | |level = 40 | ||
|password = SMIP | |password = SMIP | ||
| Line 21: | Line 22: | ||
}} | }} | ||
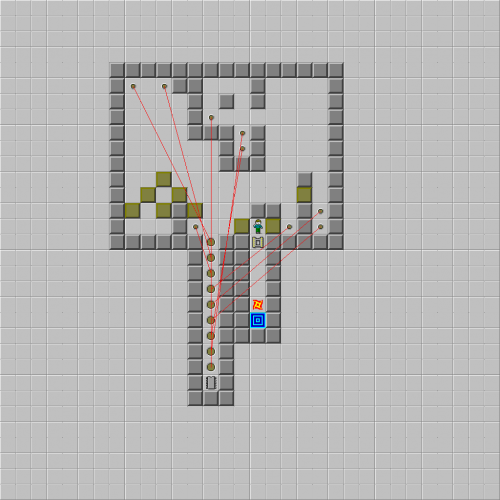
'''Traps II''' is the 40th level in [[Chip's Challenge Level Pack 2]]. | '''Traps II''' is the 40th level in [[Chip's Challenge Level Pack 2]]. As with [[Traps I]], Chip must move [[block]]s onto [[brown button]]s to access the level's [[Computer chip|chip]]. This level, however, is much simpler than the original, with only the blocks and a [[fireball]] to worry about. | ||
As with [[Traps I | |||
Move block 9, at the start, onto its button, then move to the "pyramid" on the left and play its top into the bottom of the "9" section to the north. Continue by thrusting block 3 3R, then block 7 2U 5R, and then shove block 4 R to prepare for a combination: Load the 9 with block 7 and push block 4 2D on the way back down. | Move block 9, at the start, onto its button, then move to the "pyramid" on the left and play its top into the bottom of the "9" section to the north. Continue by thrusting block 3 3R, then block 7 2U 5R, and then shove block 4 R to prepare for a combination: Load the 9 with block 7 and push block 4 2D on the way back down. | ||
For another run, move block 3 U 3R, block 2 2R, blocks 5 and 6 to the buttons above, and then run block 2 to the far east. Combine blocks 3 and 2, then move block 8 onto the button to finish the traps, pick up the chip, and open the socket. Dodge the | For another run, move block 3 U 3R, block 2 2R, blocks 5 and 6 to the buttons above, and then run block 2 to the far east. Combine blocks 3 and 2, then move block 8 onto the button to finish the traps, pick up the chip, and open the socket. Dodge the fireball with ULU, then return to the exit. | ||
==Full level map== | ==Full level map== | ||
Revision as of 00:01, 31 March 2019
Traps II is the 40th level in Chip's Challenge Level Pack 2. As with Traps I, Chip must move blocks onto brown buttons to access the level's chip. This level, however, is much simpler than the original, with only the blocks and a fireball to worry about.
Move block 9, at the start, onto its button, then move to the "pyramid" on the left and play its top into the bottom of the "9" section to the north. Continue by thrusting block 3 3R, then block 7 2U 5R, and then shove block 4 R to prepare for a combination: Load the 9 with block 7 and push block 4 2D on the way back down.
For another run, move block 3 U 3R, block 2 2R, blocks 5 and 6 to the buttons above, and then run block 2 to the far east. Combine blocks 3 and 2, then move block 8 onto the button to finish the traps, pick up the chip, and open the socket. Dodge the fireball with ULU, then return to the exit.
Full level map
Walkthrough
| Previous Level | Current Level | Next Level |
|---|---|---|
| ← Yike-O-Matic | Traps II | Ladder Needs a Wash → |
