Please create an account or Login! Have fun!
Hmmm!: Difference between revisions
(Added full level map) |
Indyindeed (talk | contribs) mNo edit summary |
||
| Line 3: | Line 3: | ||
|image = [[Image:CCLP2 Level 42.png|300px]] | |image = [[Image:CCLP2 Level 42.png|300px]] | ||
|levelset = [[Chip's Challenge Level Pack 2]] | |levelset = [[Chip's Challenge Level Pack 2]] | ||
|designer = [[Eric Schmidt]] | |||
|level = 42 | |level = 42 | ||
|password = EVFC | |password = EVFC | ||
|hint = NOT! You're far from done! ( | |hint = NOT! You're far from done!<br>''(no hint tile)'' | ||
|chips required = 0 | |chips required = 0 | ||
|chips available = 0 | |chips available = 0 | ||
| Line 21: | Line 22: | ||
}} | }} | ||
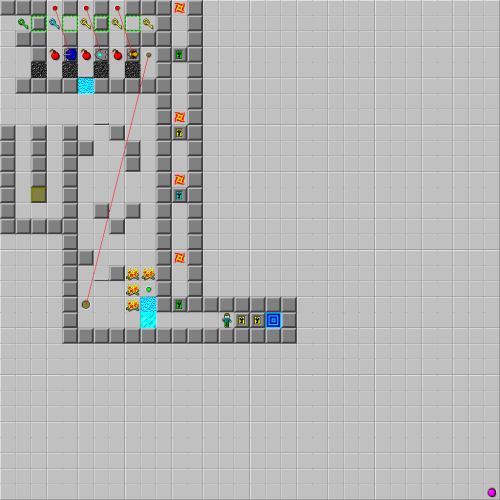
'''Hmmm!''' is the 42nd level in [[Chip's Challenge Level Pack 2 | '''Hmmm!''' is the 42nd level in [[Chip's Challenge Level Pack 2]]. The level name suggests some kind of tricky puzzle, but Hmmm! is actually a very simple level. | ||
[[Chip]] needs to throw the four [[fireball]]s into and through the [[trap]], which goes toward a [[block]] that redirects them onto the [[green button]]; Chip cannot reach this square himself. Chip will then be able to collect the keys to release the next fireball, and also to clone a [[monster]] to remove a [[bomb]], allowing him to escape the succeeding wall gates. | [[Chip]] needs to throw the four [[fireball]]s into and through the [[trap]], which goes toward a [[block]] that redirects them onto the [[green button]]; Chip cannot reach this square himself. Chip will then be able to collect the keys to release the next fireball, and also to clone a [[monster]] to remove a [[bomb]], allowing him to escape the succeeding wall gates. | ||
| Line 29: | Line 30: | ||
Now, release the third fireball, then dodge to the right, and wait [2] before releasing the fourth fireball as well. Although this can be done immediately, it will take longer than an additional two moves for the fireball to reach the trap after the first one is released if this is done. The third will keep the fourth bouncing 8L 8R until the third fireball is released, and then the fourth will follow behind it. For optimum results, hit the brown button, then move D [3] U to cause a collision between the fireballs that allows the green button to be toggled quicker. <!--second fireball reaches (7,10) and goes north--> | Now, release the third fireball, then dodge to the right, and wait [2] before releasing the fourth fireball as well. Although this can be done immediately, it will take longer than an additional two moves for the fireball to reach the trap after the first one is released if this is done. The third will keep the fourth bouncing 8L 8R until the third fireball is released, and then the fourth will follow behind it. For optimum results, hit the brown button, then move D [3] U to cause a collision between the fireballs that allows the green button to be toggled quicker. <!--second fireball reaches (7,10) and goes north--> | ||
Now, circle back to the toggle walls, blast through both of them, then clone a [[bug]] | Now, circle back to the toggle walls, blast through both of them, then clone a [[bug]]. With the way back free, return and unlock the [[exit]]. | ||
==Full level map== | ==Full level map== | ||
Revision as of 10:05, 31 March 2019
Hmmm! is the 42nd level in Chip's Challenge Level Pack 2. The level name suggests some kind of tricky puzzle, but Hmmm! is actually a very simple level.
Chip needs to throw the four fireballs into and through the trap, which goes toward a block that redirects them onto the green button; Chip cannot reach this square himself. Chip will then be able to collect the keys to release the next fireball, and also to clone a monster to remove a bomb, allowing him to escape the succeeding wall gates.
Move around to the block, play it L 5U, then take the green key and shove the block 4R on the way back to the green lock. Open this up, release the fireball, take the blue key, and do the same. While waiting for the second toggle wall to open, clone a tank to open the path back.
Now, release the third fireball, then dodge to the right, and wait [2] before releasing the fourth fireball as well. Although this can be done immediately, it will take longer than an additional two moves for the fireball to reach the trap after the first one is released if this is done. The third will keep the fourth bouncing 8L 8R until the third fireball is released, and then the fourth will follow behind it. For optimum results, hit the brown button, then move D [3] U to cause a collision between the fireballs that allows the green button to be toggled quicker.
Now, circle back to the toggle walls, blast through both of them, then clone a bug. With the way back free, return and unlock the exit.
Full level map
Walkthrough
| Previous Level | Current Level | Next Level |
|---|---|---|
| ← Ladder Needs a Wash | Hmmm! | Ray of Light → |
