Please create an account or Login! Have fun!
Mads' Rush II: Difference between revisions
m (Conversion script moved page Mads' Rush II to mads' Rush II: Converting page titles to lowercase) |
mNo edit summary |
||
| (8 intermediate revisions by 5 users not shown) | |||
| Line 1: | Line 1: | ||
{{Infobox Level | {{Infobox Level | ||
|pack = cclp2 | |||
| | |||
|level = 71 | |level = 71 | ||
| | |image = [[File:CCLP2 Level 71.png|300px]] | ||
| | |||
}} | }} | ||
'''Mads' Rush II''' is the 71st level in [[Chip's Challenge Level Pack 2]]. This level is more extended than [[Mads' Rush I]], | '''Mads' Rush II''' is the 71st level in [[Chip's Challenge Level Pack 2]]. This level is more extended than [[Mads' Rush I|the first]], featuring many more obstacles, a [[blue wall]] maze, and a random [[force floor]] section which will annoy a lot of [[Bold time|bold]] seekers. This level can be done in even or odd step; this route is in [[even step]]. | ||
Open the [[toggle wall]], pass the green lock, then take the [[flippers]] and [[fire boots]] and crawl to the bottom. Take the top chip, then in even step move RLD 2R 2U and in odd step DUR [1] DR 2U, and walk through the [[socket]]. Break the blue walls with 5R 3U 4R 2D L 2D, jump past the [[gravel]], and use the [[yellow key]] to pass the lock. Now, Chip must dive to the [[green button]] below, then go through the open toggle wall. (Chip cannot touch the button earlier: after the [[fire boots]] or before the chips - because he cannot then sneak in front of the [[pink ball]].) | Open the [[toggle wall]], pass the green lock, then take the [[flippers]] and [[fire boots]] and crawl to the bottom. Take the top chip, then in even step move RLD 2R 2U and in odd step DUR [1] DR 2U, and walk through the [[socket]]. Break the blue walls with 5R 3U 4R 2D L 2D, jump past the [[gravel]], and use the [[yellow key]] to pass the lock. Now, Chip must dive to the [[green button]] below, then go through the open toggle wall. (Chip cannot touch the button earlier: after the [[fire boots]] or before the chips - because he cannot then sneak in front of the [[pink ball]].) | ||
Now, move past the [[fake exit]]. Should the time be 38.6 or higher when Chip is R off this, he is safe for at least 25. Pass the [[tank]] and more pink balls, and then collect the hidden [[ice skates]] east of the balls to skate through the | Now, move past the [[fake exit]]. Should the time be 38.6 or higher when Chip is R off this, he is safe for at least 25. Pass the [[tank]] and more pink balls, and then collect the hidden [[ice skates]] east of the balls to skate through the [[bomb]]s. Dive 3D 4L D through the [[glider]] room to reach the fire boots, then U, east and south to the exit. | ||
However, should Chip come out of the random force floors with ''absolutely perfect'' luck, reaching the fake exit at 40.0, he can score the bold time of 26. While this was proven long ago in a [[derandomization]] test by [[Andrew Bennett]], which elicited the same route, the high level of luck (bold is a [1/4 ^ 4] * 1/2 = 1/512 probability) and the 19-second delay between attempts left it unclaimed for years. On June 23, 2009, [[James Anderson]] finally collected it, in the [[AVI]] solution shown below. | |||
== Fix for Lynx == | |||
Although the fake exit will not affect Mads' Rush II's playability in [[Lynx ruleset|Lynx]], the hidden ice skates do. In [[Chip's Challenge Level Pack 2 (Lynx)|CCLXP2]], the fake exit was changed to a real exit one tile left and an [[invisible wall]] was added; since some early versions of [[Tile World]] Lynx read fake exits as real ones and the level would be [[Busted level|busted]]. The skates were moved to the upper layer and an east [[thin wall]] was added at (20, 6). | |||
==Full level map== | |||
[[File:Cclp2_full_map_level_71.png|500px]] | |||
== Walkthrough == | == Walkthrough == | ||
Latest revision as of 06:32, 30 April 2020

| |
| Level set | Chip's Challenge Level Pack 2 |
|---|---|
| Level number | 71 |
| Designer | Anne Olsen |
| Password | DLSN |
| Chips | 7 required / 7 available |
| Time limit | 60 |
| MS (Scores) | |
| Bold time | 26 |
| Public time | 26 |
| Casual difficulty | ***** |
| Bold execution difficulty |
***** |
| Bold routing difficulty |
***** |
| Bold luck difficulty |
***** |
| Lynx (Scores) | |
| Bold time | 24 |
| Public time | 24 |
| Casual difficulty | ***** |
| Bold execution difficulty |
***** |
| Bold routing difficulty |
***** |
| Bold luck difficulty |
***** |
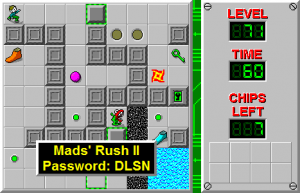
Mads' Rush II is the 71st level in Chip's Challenge Level Pack 2. This level is more extended than the first, featuring many more obstacles, a blue wall maze, and a random force floor section which will annoy a lot of bold seekers. This level can be done in even or odd step; this route is in even step.
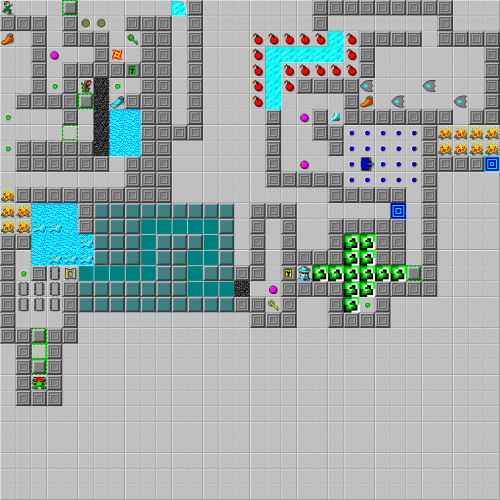
Open the toggle wall, pass the green lock, then take the flippers and fire boots and crawl to the bottom. Take the top chip, then in even step move RLD 2R 2U and in odd step DUR [1] DR 2U, and walk through the socket. Break the blue walls with 5R 3U 4R 2D L 2D, jump past the gravel, and use the yellow key to pass the lock. Now, Chip must dive to the green button below, then go through the open toggle wall. (Chip cannot touch the button earlier: after the fire boots or before the chips - because he cannot then sneak in front of the pink ball.)
Now, move past the fake exit. Should the time be 38.6 or higher when Chip is R off this, he is safe for at least 25. Pass the tank and more pink balls, and then collect the hidden ice skates east of the balls to skate through the bombs. Dive 3D 4L D through the glider room to reach the fire boots, then U, east and south to the exit.
However, should Chip come out of the random force floors with absolutely perfect luck, reaching the fake exit at 40.0, he can score the bold time of 26. While this was proven long ago in a derandomization test by Andrew Bennett, which elicited the same route, the high level of luck (bold is a [1/4 ^ 4] * 1/2 = 1/512 probability) and the 19-second delay between attempts left it unclaimed for years. On June 23, 2009, James Anderson finally collected it, in the AVI solution shown below.
Fix for Lynx[edit]
Although the fake exit will not affect Mads' Rush II's playability in Lynx, the hidden ice skates do. In CCLXP2, the fake exit was changed to a real exit one tile left and an invisible wall was added; since some early versions of Tile World Lynx read fake exits as real ones and the level would be busted. The skates were moved to the upper layer and an east thin wall was added at (20, 6).
Full level map[edit]
Walkthrough[edit]
| Previous Level | Current Level | Next Level |
|---|---|---|
| ← Killer Spiral | Mads' Rush II | Checkerboard I → |
- Chip's Challenge Level Pack 2 Levels
- Levels designed by Anne Olsen
- Levels with casual difficulty 2 (MS)
- Levels with bold execution difficulty 1 (MS)
- Levels with bold routing difficulty 1 (MS)
- Levels with luck rating 5 (MS)
- Levels with casual difficulty 2 (Lynx)
- Levels with bold execution difficulty 1 (Lynx)
- Levels with bold routing difficulty 1 (Lynx)
- Levels unplayable in Lynx
