Please create an account or Login! Have fun!
Mishmesh: Difference between revisions
imported>Ihavenoname248 No edit summary |
Sharpeye468 (talk | contribs) m (Updated to new level template) |
||
| (12 intermediate revisions by 6 users not shown) | |||
| Line 1: | Line 1: | ||
{{Infobox Level | {{Infobox Level | ||
| | |pack = cc1 | ||
|level = 30 | |level = 30 | ||
| | |image = [[File:Level_30.png|300px]] | ||
| | |||
}} | }} | ||
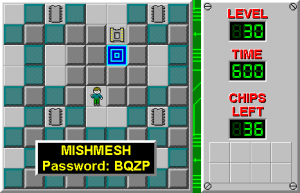
'''Mishmesh''' is the 30th level in [[Chip's Challenge 1]]. Mishmesh is a simple but hard maze level, which is completely symmetrical all the way around in a cage of [[blue wall]]s. Each corner is divided into a square of nine chips by a plus sign. | '''Mishmesh''' is the 30th level in [[Chip's Challenge 1]]. Mishmesh is a simple but hard maze level, which is completely symmetrical all the way around in a cage of [[blue wall]]s. Each corner is divided into a square of nine chips by a plus sign. | ||
Although Mishmesh appears difficult, there are easy, quick tips that will make the level easier to play. The general direction of moving is first to the south, then southwest and clockwise all the way to the east-center, and a detour to the southeast before going back to the center and exit. There are many turns throughout, and most of the paths will be even numbers of squares. There are only 13 dead ends without [[Computer chip|chips]] in them, and none of them consist only of one space. | Although Mishmesh appears difficult, there are easy, quick tips that will make the level easier to play. The general direction of moving is first to the south, then southwest and clockwise all the way to the east-center, and a detour to the southeast before going back to the center and exit. There are many turns throughout, and most of the paths will be even numbers of squares. There are only 13 dead ends without [[Computer chip|chips]] in them, and none of them consist only of one space. | ||
Generally, blue wall levels get easier the further into the level Chip goes | Generally, blue wall levels get easier the further into the level [[Chip]] goes: there are fewer blue walls, so Chip can infer which direction to go next, and possibly the likely entrance to the next big area. As a last resort, you can use the level map below to see exactly which walls are fake and which aren't. | ||
The entire route through Mishmesh is as such: DR 2D 3L 2D, which leads to (13, 22). Turn east first, and then come 2L 2D, (2D 5R 2U 3L) and 2L 2U to (9, 22). From here, move west to clear out the southwest room, then plow through the level: 2U 2R 5U (2R 3D) 4U 2R (2D, 2U 3R 2U 3L) 6L (2D) 2L 4D (2R 3D) 3D 2L 2U (2L 3U) 5U (2L 4U) 2U 2R 2U (2L 2U 2L 4U) 2U 4R (2U 2L 2U) 2D 2R (2D 4L 2U) 2U 4R (2D 3R 2D) R (2U 3L) 4R 6D (2R 2U 4R 4U 4L 2U 4L) 2D, all the way down to (20, 11). | |||
Continue 4R (2D) 2U 2R 4D 2R (2R) 2U 2R 4U 2L 2U (4U 4L, 2R 4U), and then return to (20, 11). From (20, 13), go south for two fast chips, then remove the remaining chips: 2R 3D 2R U 2R 3D (2D 2L 2U) 2R (3U 2R 3D) 3:[2D 2R 2D 2L] 2L 2U 2L 4U. Go back to (20, 11) and, with no chips left, go west and exit. | |||
==Decade message== | |||
In [[Lynx|the Lynx version]], Chip receives this [[decade message]]:<br>''Chip's thick-soled shoes and pop-bottle glasses speed him through the mazes while his calculator watch keeps track of [[Time limit|time]].'' | |||
==Full level map== | |||
[[File:Cc1_full_map_level_30.png|500px]] | |||
== Walkthrough == | == Walkthrough == | ||
{{#ev:youtube|Ag2kWAh9BeQ}} | |||
{{Level Progression|Arcticflow|Knot}} | {{Level Progression|Arcticflow|Knot}} | ||
Latest revision as of 04:34, 30 April 2020

| |
| Level set | Chip's Challenge 1 |
|---|---|
| Level number | 30 |
| Designer | Unknown |
| Password | BQZP |
| Chips | 36 required / 36 available |
| Time limit | 600 |
| MS (Scores) | |
| Bold time | 454 |
| Public time | 454 |
| Casual difficulty | ***** |
| Bold execution difficulty |
***** |
| Bold routing difficulty |
***** |
| Bold luck difficulty |
***** |
| Lynx (Scores) | |
| Bold time | 454 |
| Public time | 454 |
| Casual difficulty | ***** |
| Bold execution difficulty |
***** |
| Bold routing difficulty |
***** |
| Bold luck difficulty |
***** |
| Steam (Scores) | |
| Bold time | 454 |
| Public time | 454 |
| Casual difficulty | ***** |
| Bold execution difficulty |
***** |
| Bold routing difficulty |
***** |
| Bold luck difficulty |
***** |
Mishmesh is the 30th level in Chip's Challenge 1. Mishmesh is a simple but hard maze level, which is completely symmetrical all the way around in a cage of blue walls. Each corner is divided into a square of nine chips by a plus sign.
Although Mishmesh appears difficult, there are easy, quick tips that will make the level easier to play. The general direction of moving is first to the south, then southwest and clockwise all the way to the east-center, and a detour to the southeast before going back to the center and exit. There are many turns throughout, and most of the paths will be even numbers of squares. There are only 13 dead ends without chips in them, and none of them consist only of one space.
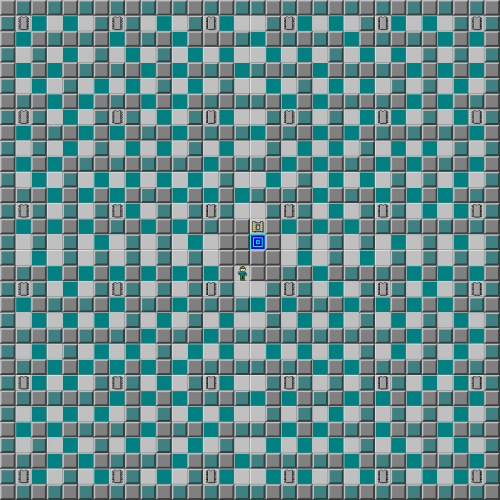
Generally, blue wall levels get easier the further into the level Chip goes: there are fewer blue walls, so Chip can infer which direction to go next, and possibly the likely entrance to the next big area. As a last resort, you can use the level map below to see exactly which walls are fake and which aren't.
The entire route through Mishmesh is as such: DR 2D 3L 2D, which leads to (13, 22). Turn east first, and then come 2L 2D, (2D 5R 2U 3L) and 2L 2U to (9, 22). From here, move west to clear out the southwest room, then plow through the level: 2U 2R 5U (2R 3D) 4U 2R (2D, 2U 3R 2U 3L) 6L (2D) 2L 4D (2R 3D) 3D 2L 2U (2L 3U) 5U (2L 4U) 2U 2R 2U (2L 2U 2L 4U) 2U 4R (2U 2L 2U) 2D 2R (2D 4L 2U) 2U 4R (2D 3R 2D) R (2U 3L) 4R 6D (2R 2U 4R 4U 4L 2U 4L) 2D, all the way down to (20, 11).
Continue 4R (2D) 2U 2R 4D 2R (2R) 2U 2R 4U 2L 2U (4U 4L, 2R 4U), and then return to (20, 11). From (20, 13), go south for two fast chips, then remove the remaining chips: 2R 3D 2R U 2R 3D (2D 2L 2U) 2R (3U 2R 3D) 3:[2D 2R 2D 2L] 2L 2U 2L 4U. Go back to (20, 11) and, with no chips left, go west and exit.
Decade message[edit]
In the Lynx version, Chip receives this decade message:
Chip's thick-soled shoes and pop-bottle glasses speed him through the mazes while his calculator watch keeps track of time.
Full level map[edit]
Walkthrough[edit]
| Previous Level | Current Level | Next Level |
|---|---|---|
| ← Arcticflow | Mishmesh | Knot → |
- Chip's Challenge 1 Levels
- Levels by unknown designers
- Levels with casual difficulty 3 (MS)
- Levels with bold execution difficulty 3 (MS)
- Levels with bold routing difficulty 1 (MS)
- Levels with casual difficulty 3 (Lynx)
- Levels with bold execution difficulty 3 (Lynx)
- Levels with bold routing difficulty 1 (Lynx)
- Levels with casual difficulty 3 (Steam)
- Levels with bold execution difficulty 3 (Steam)
- Levels with bold routing difficulty 1 (Steam)
