Please create an account or Login! Have fun!
Paw-Print Isle: Difference between revisions
imported>Ihavenoname248 No edit summary |
(Updated YouTube video) |
||
| (11 intermediate revisions by 7 users not shown) | |||
| Line 1: | Line 1: | ||
{{Infobox Level | {{Infobox Level | ||
|pack = cclp2 | |||
| | |||
|level = 16 | |level = 16 | ||
| | |image = [[File:CCLP2 Level 16.png|300px]] | ||
| | |||
}} | }} | ||
'''Paw-Print Isle''' is the 16th level in [[Chip's Challenge Level Pack 2]]. Largely living up to its title, Paw-Print Isle consists of 17 [[block]]s with chips under each one, which must fill in 17 [[water]] spaces to reach another 17 chips. Moving the blocks is easy, but how to do it in the quickest time is a bit tough because of the tight dimensions and no specific pattern to the [[ice]] | '''Paw-Print Isle''' is the 16th level in [[Chip's Challenge Level Pack 2]]. Largely living up to its title, Paw-Print Isle consists of 17 [[block]]s with chips under each one, which must fill in 17 [[water]] spaces to reach another 17 chips. Moving the blocks is easy, but how to do it in the quickest time is a bit tough because of the tight dimensions and no specific pattern to the [[ice]]. | ||
Use blocks 5 and 2 to collect chips, then return and use blocks 14, 16 and 17 to collect three chips. On the return, step R 3U L 2U, rather than simply holding north, which saves [1]. Use blocks 7 and then 11, then use a shortcut [2D L] and use blocks 1 and 3 on the left side. The next stage of the level requires Chip to set up a continual block chain around the northeast of the level, using the ice to leap around, meanwhile collecting some other loose chips. | Use blocks 5 and 2 to collect chips, then return and use blocks 14, 16 and 17 to collect three chips. On the return, step R 3U L 2U, rather than simply holding north, which saves [1]. Use blocks 7 and then 11, then use a shortcut [2D L] and use blocks 1 and 3 on the left side. The next stage of the level requires Chip to set up a continual block chain around the northeast of the level, using the ice to leap around, meanwhile collecting some other loose chips. | ||
| Line 28: | Line 12: | ||
Because the U move to the exit is a boost, Chip can drop [1] during this route and still make [[Chip's Challenge scoring|313 -.9]]. | Because the U move to the exit is a boost, Chip can drop [1] during this route and still make [[Chip's Challenge scoring|313 -.9]]. | ||
== Trivia == | == Trivia == | ||
* The original ''Paw-Print Isle'' replaced the [[invisible wall]]s around the exit with more water, and hence it was possible to bridge to the exit while avoiding the socket - but unusually, this takes ''longer'' than collecting all the chips. | * The original ''Paw-Print Isle'' replaced the [[invisible wall]]s around the exit with more water, and hence it was possible to bridge to the exit while avoiding the socket - but unusually, this takes ''longer'' than collecting all the chips. | ||
==Full level map== | |||
[[File:Cclp2_full_map_level_16.png|500px]] | |||
== Walkthrough == | == Walkthrough == | ||
{{#ev:youtube|-EYI3aO8pNM}} | |||
{{Level Progression|Debug File|Double Trouble}} | {{Level Progression|Debug File|Double Trouble}} | ||
Latest revision as of 07:17, 13 February 2024

| |
| Level set | Chip's Challenge Level Pack 2 |
|---|---|
| Level number | 16 |
| Designer | Tyrethali Ansrath |
| Password | YUNK |
| Chips | 34 required / 34 available |
| Time limit | 350 |
| MS (Scores) | |
| Bold time | 314 |
| Public time | 314 |
| Casual difficulty | ***** |
| Bold execution difficulty |
***** |
| Bold routing difficulty |
***** |
| Bold luck difficulty |
***** |
| Lynx (Scores) | |
| Bold time | 303 |
| Public time | 301 |
| Casual difficulty | ***** |
| Bold execution difficulty |
***** |
| Bold routing difficulty |
***** |
| Bold luck difficulty |
***** |
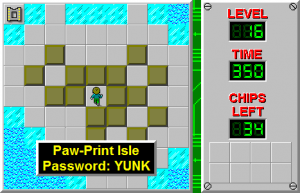
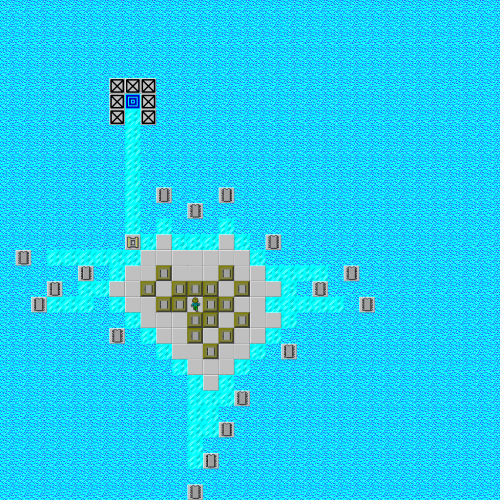
Paw-Print Isle is the 16th level in Chip's Challenge Level Pack 2. Largely living up to its title, Paw-Print Isle consists of 17 blocks with chips under each one, which must fill in 17 water spaces to reach another 17 chips. Moving the blocks is easy, but how to do it in the quickest time is a bit tough because of the tight dimensions and no specific pattern to the ice.
Use blocks 5 and 2 to collect chips, then return and use blocks 14, 16 and 17 to collect three chips. On the return, step R 3U L 2U, rather than simply holding north, which saves [1]. Use blocks 7 and then 11, then use a shortcut [2D L] and use blocks 1 and 3 on the left side. The next stage of the level requires Chip to set up a continual block chain around the northeast of the level, using the ice to leap around, meanwhile collecting some other loose chips.
The first of these is block 8; push this 4U, then use block 9 to the west, and add to the chain with block 4 [2U] and block 6 [4R]. Proceed with block 10 to the east, then move block 13 2D in preparation for beginning the chain, and use block 12 on the far west. Collect on the very bottom with block 15, and then activate the chain to collect the remaining chips all the way to the one just above the socket. Now, slide to the socket and exit the level.
Because the U move to the exit is a boost, Chip can drop [1] during this route and still make 313 -.9.
Trivia[edit]
- The original Paw-Print Isle replaced the invisible walls around the exit with more water, and hence it was possible to bridge to the exit while avoiding the socket - but unusually, this takes longer than collecting all the chips.
Full level map[edit]
Walkthrough[edit]
| Previous Level | Current Level | Next Level |
|---|---|---|
| ← Debug File | Paw-Print Isle | Double Trouble → |
- Chip's Challenge Level Pack 2 Levels
- Levels designed by Tyrethali Ansrath
- Levels with casual difficulty 1 (MS)
- Levels with bold execution difficulty 3 (MS)
- Levels with bold routing difficulty 3 (MS)
- Levels with casual difficulty 1 (Lynx)
- Levels with bold execution difficulty 3 (Lynx)
- Levels with bold routing difficulty 3 (Lynx)
