Please create an account or Login! Have fun!
Twisted Chambers: Difference between revisions
No edit summary |
mNo edit summary |
||
| (8 intermediate revisions by 5 users not shown) | |||
| Line 1: | Line 1: | ||
{{Infobox Level | {{Infobox Level | ||
| | |pack = cclp3 | ||
|level = 120 | |level = 120 | ||
| | |image = [[File:CCLP3 Level 120.png|300px]] | ||
|hint = The traps are connected horizontally. | |hint = The traps are connected horizontally. | ||
}}'''Twisted Chambers''' is the 120th level in [[Chip's Challenge Level Pack 3]]. It was created by [[J.B. Lewis]]. | |||
617 route: Play in even step. Explode the bombs to reach the first green button (the bomb at (23,6) will not be exploded). Lure the teeth round to the bottom right of its room, push the rightmost block into the bomb, then push the other block back D whilst the teeth is to the left of it. Now lure the teeth to the top, and move to 3D from the top fire at the same moment that the teeth moves D from the fire, giving enough time to explode the second bomb, press the green button, and get back out. Lure the teeth into the top right (so that it does not block the entrance for later), and exit. Go into the brown button room. Hold down the three buttons that enable the red key to be collected. Move the block on (24,15) down to (23,17), and bring the leftmost block out, and leave it 2U from the closed toggle wall. Go through the teleport, press the first green button, then the second green button (after luring the teeth to the bottom right). Push the block D, teleport and press the first green button again, teleport back and explode the bomb (note that the blue and yellow keys are not needed). Use the recessed walls in the next room to push the blocks into the bombs, and press the green button. In the force floor room, push the block across the force floors to U from the bomb, then use the teleport to push the block into the bomb. Now push the green button in the force floor room. Move the block in the next room D 5L D, making the first move as the paramecium is R of the block, so that it will end up pressing the green button every 4 steps. Now use the toggle walls below the ball to reach the exit. | |||
== Full level map == | |||
[[File:Cclp3_full_map_level_120.png|500px]] | |||
== Walkthrough == | |||
{{#ev:youtube|lW1JKQZveKs}} | |||
{{Level Progression|Elite|Jaywalker}} | {{Level Progression|Elite|Jaywalker}} | ||
Latest revision as of 05:45, 30 April 2020

| |
| Level set | Chip's Challenge Level Pack 3 |
|---|---|
| Level number | 120 |
| Designer | J.B. Lewis |
| Password | MXOT |
| Hint | The traps are connected horizontally. |
| Chips | 0 required / 0 available |
| Time limit | 750 |
| MS (Scores) | |
| Bold time | 628 |
| Public time | 628 |
| Casual difficulty | ***** |
| Bold execution difficulty |
***** |
| Bold routing difficulty |
***** |
| Bold luck difficulty |
***** |
| Lynx (Scores) | |
| Bold time | 615 |
| Public time | 540 |
| Casual difficulty | ***** |
| Bold execution difficulty |
***** |
| Bold routing difficulty |
***** |
| Bold luck difficulty |
***** |
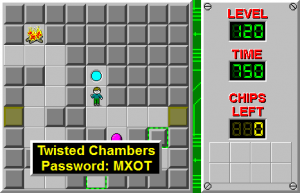
Twisted Chambers is the 120th level in Chip's Challenge Level Pack 3. It was created by J.B. Lewis.
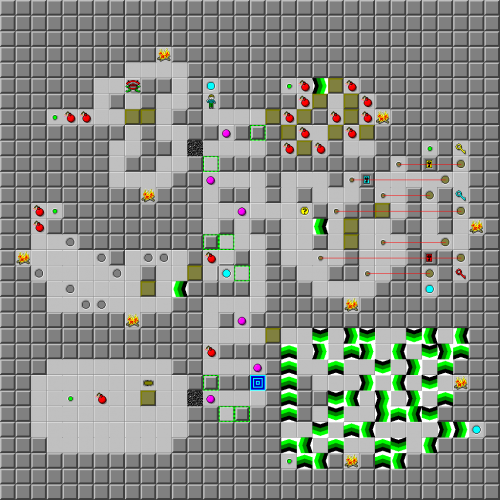
617 route: Play in even step. Explode the bombs to reach the first green button (the bomb at (23,6) will not be exploded). Lure the teeth round to the bottom right of its room, push the rightmost block into the bomb, then push the other block back D whilst the teeth is to the left of it. Now lure the teeth to the top, and move to 3D from the top fire at the same moment that the teeth moves D from the fire, giving enough time to explode the second bomb, press the green button, and get back out. Lure the teeth into the top right (so that it does not block the entrance for later), and exit. Go into the brown button room. Hold down the three buttons that enable the red key to be collected. Move the block on (24,15) down to (23,17), and bring the leftmost block out, and leave it 2U from the closed toggle wall. Go through the teleport, press the first green button, then the second green button (after luring the teeth to the bottom right). Push the block D, teleport and press the first green button again, teleport back and explode the bomb (note that the blue and yellow keys are not needed). Use the recessed walls in the next room to push the blocks into the bombs, and press the green button. In the force floor room, push the block across the force floors to U from the bomb, then use the teleport to push the block into the bomb. Now push the green button in the force floor room. Move the block in the next room D 5L D, making the first move as the paramecium is R of the block, so that it will end up pressing the green button every 4 steps. Now use the toggle walls below the ball to reach the exit.
Full level map[edit]
Walkthrough[edit]
| Previous Level | Current Level | Next Level |
|---|---|---|
| ← Elite | Twisted Chambers | Jaywalker → |
- Chip's Challenge Level Pack 3 Levels
- Levels designed by J.B. Lewis
- Levels with casual difficulty 4 (MS)
- Levels with bold execution difficulty 4 (MS)
- Levels with bold routing difficulty 4 (MS)
- Levels with casual difficulty 4 (Lynx)
- Levels with bold execution difficulty 2 (Lynx)
- Levels with bold routing difficulty 4 (Lynx)
