Please create an account or Login! Have fun!
MonsterMaze: Difference between revisions
imported>Random 8 No edit summary |
mNo edit summary |
||
| (8 intermediate revisions by 6 users not shown) | |||
| Line 1: | Line 1: | ||
{{Infobox Level | {{Infobox Level | ||
| | |pack = cclp3 | ||
|level = 35 | |level = 35 | ||
| | |image = [[File:CCLP3 Level 35.png|300px]] | ||
| | |||
}} | }} | ||
'''MonsterMaze''' is the 35th level in [[Chip's Challenge Level Pack 3]]. It was created by [[David Pinkston]], who makes his debut with this level, as 11 of his levels were eliminated from the final set of [[Chip's Challenge Level Pack 2|CCLP2]] because he could not be contacted for permission. [[Even step]] is required. | |||
'''MonsterMaze''' is the 35th level in [[Chip's Challenge Level Pack 3]]. It was created by [[David Pinkston]], who makes his debut with this level, as 11 of his levels were eliminated from the final set of [[CCLP2]] because he could not be contacted for permission. [[Even step]] is required. | |||
Lead the [[teeth]] through the [[toggle wall]] and [[gravel]] maze, along the far west and far south and across the [[floor]] space at [19, 25], then slightly eastwards and straight north, where the [[brown button]] that can release Chip into the [[exit]] lies. Stand 2U from the brown button, and just as the teeth moves to 3R D off this position, move 2L (getting as close as possible to the [[green button]] as possible while leading the teeth into the final turn, and then turning south at the first possible opportunity, but minus [1] which has to be lost or the green button will be hit ''too'' early) and then straight 6D onto the button. Exact timing is necessary for the bold. | Lead the [[teeth]] through the [[toggle wall]] and [[gravel]] maze, along the far west and far south and across the [[floor]] space at [19, 25], then slightly eastwards and straight north, where the [[brown button]] that can release Chip into the [[exit]] lies. Stand 2U from the brown button, and just as the teeth moves to 3R D off this position, move 2L (getting as close as possible to the [[green button]] as possible while leading the teeth into the final turn, and then turning south at the first possible opportunity, but minus [1] which has to be lost or the green button will be hit ''too'' early) and then straight 6D onto the button. Exact timing is necessary for the bold. | ||
The closed [[toggle wall]]s are necessary to keep the teeth on the button, but will require Chip to negotiate the maze back to the start. Walk U 2L 4D 6R 4D 2L 2U 8L 8D and pass through the floor space, then circle around the south and west edges of the level to walk straight back to the exit. | The closed [[toggle wall]]s are necessary to keep the teeth on the button, but will require Chip to negotiate the maze back to the start. Walk U 2L 4D 6R 4D 2L 2U 8L 8D and pass through the floor space, then circle around the south and west edges of the level to walk straight back to the exit. | ||
== Full level map == | |||
[[File:Cclp3_full_map_level_35.png|500px]] | |||
== Walkthrough == | |||
{{#ev:youtube|hlEnauUy4rE}} | |||
{{Level Progression|Motion Blur|Zelgon's Lair}} | {{Level Progression|Motion Blur|Zelgon's Lair}} | ||
Latest revision as of 05:26, 30 April 2020

| |
| Level set | Chip's Challenge Level Pack 3 |
|---|---|
| Level number | 35 |
| Designer | David Pinkston |
| Password | CHOE |
| Chips | 0 required / 0 available |
| Time limit | 120 |
| MS (Scores) | |
| Bold time | 59 |
| Public time | 59 |
| Casual difficulty | ***** |
| Bold execution difficulty |
***** |
| Bold routing difficulty |
***** |
| Bold luck difficulty |
***** |
| Lynx (Scores) | |
| Bold time | 59 |
| Public time | 59 |
| Casual difficulty | ***** |
| Bold execution difficulty |
***** |
| Bold routing difficulty |
***** |
| Bold luck difficulty |
***** |
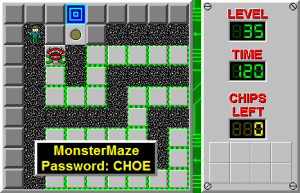
MonsterMaze is the 35th level in Chip's Challenge Level Pack 3. It was created by David Pinkston, who makes his debut with this level, as 11 of his levels were eliminated from the final set of CCLP2 because he could not be contacted for permission. Even step is required.
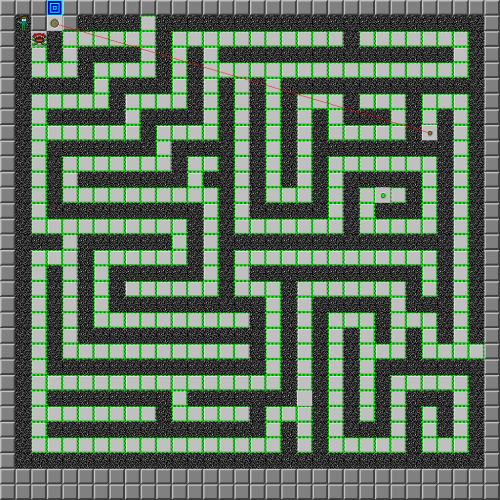
Lead the teeth through the toggle wall and gravel maze, along the far west and far south and across the floor space at [19, 25], then slightly eastwards and straight north, where the brown button that can release Chip into the exit lies. Stand 2U from the brown button, and just as the teeth moves to 3R D off this position, move 2L (getting as close as possible to the green button as possible while leading the teeth into the final turn, and then turning south at the first possible opportunity, but minus [1] which has to be lost or the green button will be hit too early) and then straight 6D onto the button. Exact timing is necessary for the bold.
The closed toggle walls are necessary to keep the teeth on the button, but will require Chip to negotiate the maze back to the start. Walk U 2L 4D 6R 4D 2L 2U 8L 8D and pass through the floor space, then circle around the south and west edges of the level to walk straight back to the exit.
Full level map[edit]
Walkthrough[edit]
| Previous Level | Current Level | Next Level |
|---|---|---|
| ← Motion Blur | MonsterMaze | Zelgon's Lair → |
- Chip's Challenge Level Pack 3 Levels
- Levels designed by David Pinkston
- Levels with casual difficulty 3 (MS)
- Levels with bold execution difficulty 1 (MS)
- Levels with bold routing difficulty 1 (MS)
- Levels with casual difficulty 3 (Lynx)
- Levels with bold execution difficulty 1 (Lynx)
- Levels with bold routing difficulty 1 (Lynx)
