Please create an account or Login! Have fun!
Oorto Geld II: Difference between revisions
m ((via JWB)) |
m (added designer to infobox) |
||
| Line 4: | Line 4: | ||
|levelset = Chip's Challenge Level Pack 2 | |levelset = Chip's Challenge Level Pack 2 | ||
|level = 113 | |level = 113 | ||
|designer = Drew Thomas | |||
|password = EFWS | |password = EFWS | ||
|chips required = 60 | |chips required = 60 | ||
| Line 18: | Line 19: | ||
|bold difficulty lynx = 3 | |bold difficulty lynx = 3 | ||
|bold complexity lynx = 3 | |bold complexity lynx = 3 | ||
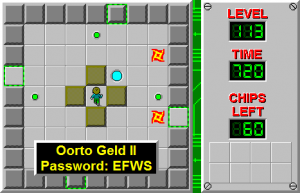
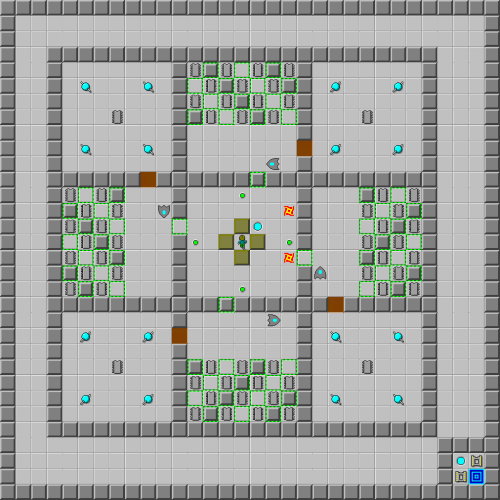
}} | }}'''Oorto Geld II''' is the 113th level in [[Chip's Challenge Level Pack 2]]. The structure of Oorto Geld II, like [[Oorto Geld|the original]], is made of [[toggle wall]]s which lead to different sections. However, in this level, only four sections exist, the [[fireball]]s already change the wall for Chip, and [[walker]]s guard one chip in each section, which makes Oorto Geld II a little bit annoying: not only can the walkers block Chip, but they can interfere with the [[green button]]s on some occasions. As [[Drew Thomas]] puts it in the original title, ''You Can't Remake Oorto Geld''. | ||
'''Oorto Geld II''' is the 113th level in [[Chip's Challenge Level Pack 2]]. The structure of Oorto Geld II, like [[Oorto Geld|the original]], is made of [[toggle wall]]s which lead to different sections. However, in this level, only four sections exist, the [[fireball]]s already change the wall for Chip, and [[walker]]s guard one chip in each section, which makes Oorto Geld II a little bit annoying: not only can the walkers block Chip, but they can interfere with the [[green button]]s on some occasions. As [[Drew Thomas]] puts it in the original title, ''You Can't Remake Oorto Geld''. | |||
The proper route through is R 6U RU 4L 3U L 2D 2R 2U 2R DLD 2R U [1] UR 2D L 3D, then take the walker's chip. Now, slide over the [[teleport]] (which is inactive, and thus works as [[ice]], until all the chips are taken), and step off the toggle wall to the right: 4R 3U 3R U 2L 2D 2R 2D LUL 2D R [1] RD 3L U 2L, and now take the chip from the walkers. In this section, Chip can expend up to three moves waiting for the walkers. | The proper route through is R 6U RU 4L 3U L 2D 2R 2U 2R DLD 2R U [1] UR 2D L 3D, then take the walker's chip. Now, slide over the [[teleport]] (which is inactive, and thus works as [[ice]], until all the chips are taken), and step off the toggle wall to the right: 4R 3U 3R U 2L 2D 2R 2D LUL 2D R [1] RD 3L U 2L, and now take the chip from the walkers. In this section, Chip can expend up to three moves waiting for the walkers. | ||
| Line 26: | Line 25: | ||
To the south, move 4D 4R D 3L D 2R [1] RD 6L [1] 2U RDRUL 3U, and Chip can lose one move to the walkers. Finally, to the west, 4L U 3L U 6D 2R URUL [1] LD 2U 2R UL 2U 3R, and head for the teleport and slide R, then step instantly D to exit. This [[boosting]] allows for a [[Chip's Challenge scoring|671 -.9 score]]. | To the south, move 4D 4R D 3L D 2R [1] RD 6L [1] 2U RDRUL 3U, and Chip can lose one move to the walkers. Finally, to the west, 4L U 3L U 6D 2R URUL [1] LD 2U 2R UL 2U 3R, and head for the teleport and slide R, then step instantly D to exit. This [[boosting]] allows for a [[Chip's Challenge scoring|671 -.9 score]]. | ||
==Full level map== | == Full level map == | ||
[[File:Cclp2_full_map_level_113.png|500px]] | [[File:Cclp2_full_map_level_113.png|500px]] | ||
Revision as of 15:38, 30 March 2020
Error: Invalid JSON ($2).{| class="wikitable infobox plainlinks" style="width: 30%; align: right; text-align: center;"
|+ Oorto Geld II
|-
| colspan="2"| |-
! width="1%" nowrap="nowrap"|Level set
| [[Error: no local variable "LEVELSET" has been set.]]
|-
! width="1%" nowrap="nowrap"|Level number
| Error: no local variable "LEVEL" has been set.
|-
! width="1%" nowrap="nowrap"|Designer
| [[Error: no local variable "DESIGNER" has been set.]]
|-
|-
! width="1%" nowrap="nowrap"|Password
| Error: no local variable "PASSWORD" has been set.
|-
|-
! width="1%" nowrap="nowrap"|Password notes
| Error: no local variable "PW_NOTE" has been set.
|-
|- style="display:none;"
! width="1%" nowrap="nowrap"|Hint
| {{{hint}}}
|-
|-
! width="1%" nowrap="nowrap"|Chips
|
|-
|-
! width="1%" nowrap="nowrap"|Chips notes
| Error: no local variable "CHIPS_NOTE" has been set.
|-
! width="1%" nowrap="nowrap"|Time limit
| ---
|-
|-
| colspan = "2" | MS (Scores)
|-
|-
|-
! width="1%" nowrap="nowrap"|Melinda time
| Error: no local variable "MS_MELINDA" has been set.
|-
|-
! width="1%" nowrap="nowrap"|Bold time
| Error: no local variable "MS_BOLD" has been set.
|-
|-
! width="1%" nowrap="nowrap"|Public time
| Error: no local variable "MS_PUBLIC" has been set.
|-
|-
! width="1%" nowrap="nowrap"|Casual difficulty
| *****
|-
|-
! width="1%" nowrap="nowrap"|Bold execution
difficulty
| *****
|-
|-
! width="1%" nowrap="nowrap"|Bold routing
difficulty
| *****
|-
|-
! width="1%" nowrap="nowrap"|Bold luck
difficulty
| *****
|- |- ! width="1%" nowrap="nowrap"|Mouse Required | Note: This level's bold route requires use of the mouse. |- |- |- | colspan = "2" | Lynx (Scores) |- |- |- ! width="1%" nowrap="nowrap"|Melinda time | Error: no local variable "LYNX_MELINDA" has been set. |- |- ! width="1%" nowrap="nowrap"|Bold time | Error: no local variable "LYNX_BOLD" has been set. |- |- ! width="1%" nowrap="nowrap"|Public time | Error: no local variable "LYNX_PUBLIC" has been set. |- |- ! width="1%" nowrap="nowrap"|Casual difficulty | *****
|-
|-
! width="1%" nowrap="nowrap"|Bold execution
difficulty
| *****
|-
|-
! width="1%" nowrap="nowrap"|Bold routing
difficulty
| *****
|-
|-
! width="1%" nowrap="nowrap"|Bold luck
difficulty
| *****
|- |- |- | colspan = "2" | Steam (Scores) |- |- style="display:none;" ! width="1%" nowrap="nowrap"|Bold time | Error: no local variable "STEAM_TIME_BOLD" has been set. |- |- ! width="1%" nowrap="nowrap"|Bold time | Error: no local variable "STEAM_TIME_BOLD" has been set. |- |- style="display:none;" ! width="1%" nowrap="nowrap"|Public time | Error: no local variable "STEAM_TIME_PUBLIC" has been set. |- |- ! width="1%" nowrap="nowrap"|Public time | Error: no local variable "STEAM_TIME_PUBLIC" has been set. |- |- ! width="1%" nowrap="nowrap"|Casual difficulty | *****
|-
|-
! width="1%" nowrap="nowrap"|Bold execution
difficulty
| *****
|-
|-
! width="1%" nowrap="nowrap"|Bold routing
difficulty
| *****
|-
|-
! width="1%" nowrap="nowrap"|Bold luck
difficulty
| *****
|- |- ! width="1%" nowrap="nowrap"|Bold score | Error: no local variable "STEAM_SCORE_BOLD" has been set. |- |- ! width="1%" nowrap="nowrap"|Public score | Error: no local variable "STEAM_SCORE_PUBLIC" has been set. |- |- ! width="1%" nowrap="nowrap"|Casual difficulty | *****
|-
|-
! width="1%" nowrap="nowrap"|Bold execution
difficulty
| *****
|-
|-
! width="1%" nowrap="nowrap"|Bold routing
difficulty
| *****
|-
|-
! width="1%" nowrap="nowrap"|Bold luck
difficulty
| *****
|- |- |}[[Category:Error: no local variable "LEVELSET" has been set. Levels]] [[Category:Levels designed by Error: no local variable "DESIGNER" has been set.]] [[Category:Levels with casual difficulty Error: no local variable "MS_CASUAL" has been set. (MS)]] [[Category:Levels with bold execution difficulty Error: no local variable "MS_EXEC" has been set. (MS)]] [[Category:Levels with bold routing difficulty Error: no local variable "MS_ROUTE" has been set. (MS)]] [[Category:Levels with luck rating Error: no local variable "MS_LUCK" has been set. (MS)]] [[Category:Levels with casual difficulty Error: no local variable "LYNX_CASUAL" has been set. (Lynx)]] [[Category:Levels with bold execution difficulty Error: no local variable "LYNX_EXEC" has been set. (Lynx)]] [[Category:Levels with bold routing difficulty Error: no local variable "LYNX_ROUTE" has been set. (Lynx)]] [[Category:Levels with luck rating Error: no local variable "LYNX_LUCK" has been set. (Lynx)]] [[Category:Levels with casual difficulty Error: no local variable "STEAM_TIME_CASUAL" has been set. (Steam)]] [[Category:Levels with bold execution difficulty Error: no local variable "STEAM_TIME_EXEC" has been set. (Steam)]] [[Category:Levels with bold routing difficulty Error: no local variable "STEAM_TIME_ROUTE" has been set. (Steam)]] [[Category:Levels with luck rating Error: no local variable "STEAM_TIME_LUCK" has been set. (Steam)]] [[Category:Levels with casual difficulty Error: no local variable "STEAM_SCORE_CASUAL" has been set. (Steam score)]] [[Category:Levels with bold execution difficulty Error: no local variable "STEAM_SCORE_EXEC" has been set. (Steam score)]] [[Category:Levels with bold routing difficulty Error: no local variable "STEAM_SCORE_ROUTE" has been set. (Steam score)]] [[Category:Levels with bold luck rating Error: no local variable "STEAM_SCORE_LUCK" has been set. (Steam Score)]]Oorto Geld II is the 113th level in Chip's Challenge Level Pack 2. The structure of Oorto Geld II, like the original, is made of toggle walls which lead to different sections. However, in this level, only four sections exist, the fireballs already change the wall for Chip, and walkers guard one chip in each section, which makes Oorto Geld II a little bit annoying: not only can the walkers block Chip, but they can interfere with the green buttons on some occasions. As Drew Thomas puts it in the original title, You Can't Remake Oorto Geld.
The proper route through is R 6U RU 4L 3U L 2D 2R 2U 2R DLD 2R U [1] UR 2D L 3D, then take the walker's chip. Now, slide over the teleport (which is inactive, and thus works as ice, until all the chips are taken), and step off the toggle wall to the right: 4R 3U 3R U 2L 2D 2R 2D LUL 2D R [1] RD 3L U 2L, and now take the chip from the walkers. In this section, Chip can expend up to three moves waiting for the walkers.
To the south, move 4D 4R D 3L D 2R [1] RD 6L [1] 2U RDRUL 3U, and Chip can lose one move to the walkers. Finally, to the west, 4L U 3L U 6D 2R URUL [1] LD 2U 2R UL 2U 3R, and head for the teleport and slide R, then step instantly D to exit. This boosting allows for a 671 -.9 score.
Full level map
Walkthrough
| Previous Level | Current Level | Next Level |
|---|---|---|
| ← After the Rainstorm | Oorto Geld II | Joyride II → |
