Please create an account or Login! Have fun!
Problem Solver: Difference between revisions
imported>FalsettoPiano119 m (Fixed the password) |
(Removed disconfirmed speculation that the level was inspired by Myst III: Exile.) |
||
| (11 intermediate revisions by 7 users not shown) | |||
| Line 1: | Line 1: | ||
{{Infobox Level | {{Infobox Level | ||
| | |pack = cclp3 | ||
|level = 30 | |level = 30 | ||
| | |image = [[File:CCLP3_Level_30.png|300px]] | ||
|hint = The [[glider]] is your ticket out of here! Don't release it until the column of [[bomb]]s is cleared. | |hint = The [[glider]] is your ticket out of here! Don't release it until the column of [[bomb]]s is cleared. | ||
}} | }} | ||
'''Problem Solver''' is the 30th level in [[Chip's Challenge Level Pack 3]]. It was created by [[ | '''Problem Solver''' is the 30th level in [[Chip's Challenge Level Pack 3]]. It was created by [[J.B. Lewis]]. Several different puzzles are set up in a specific order, the main one being the four bombs in a glider's range where only the last one, guarding the exit, can be touched by it. The goals of the other three puzzles are to explode these three such that the fourth is removed by the glider. | ||
Begin in [[odd step]], as part of the initial goal is to lure a [[teeth]] through a [[thin wall]] maze as soon as it starts moving. Move R [4] DL [3] UD, bringing the teeth around the first main corner, then eliminate one bomb by cloning at [10, 18] from [4, 18]. The correct [[clone machine]] must be used to explode the first bomb, but since the corresponding cloner is located on the same row as each button, this is based off simple logic. (The other logical pattern is usually in [[reading order]], often reverse.) To pull the teeth around another corner, move to [15, 20] (above the blue key) and move (2R, 2L R) before collecting the key. | Begin in [[odd step]], as part of the initial goal is to lure a [[teeth]] through a [[thin wall]] maze as soon as it starts moving. Move R [4] DL [3] UD, bringing the teeth around the first main corner, then eliminate one bomb by cloning at [10, 18] from [4, 18]. The correct [[clone machine]] must be used to explode the first bomb, but since the corresponding cloner is located on the same row as each button, this is based off simple logic. (The other logical pattern is usually in [[reading order]], often reverse.) To pull the teeth around another corner, move to [15, 20] (above the blue key) and move (2R, 2L R) before collecting the key. | ||
Walk past the [[pink ball]] and block its guard on the [[yellow key]] by placing the [[block]] 4D away, and use it to enter another room where the teeth can finally explode the bomb. Take the [[red key]] and switch the [[toggle wall]]s, which allows the other [[fireball]] clone machine to explode the second of three bombs, accessing the [[green key]] that unlocks two further blocks. Move block 1 L and block 2 4L onto the [[brown button]], then push blocks 1 and 2 south to access a third block, which will explode the third of three bombs and eat Chip's keys in the process. With the way clear, remove the [[blue wall]]s guarding the glider and sneak into the exit. | Walk past the [[pink ball]] and block its guard on the [[yellow key]] by placing the [[block]] 4D away, and use it to enter another room where the teeth can finally explode the bomb. Take the [[red key]] and switch the [[toggle wall]]s, which allows the other [[fireball]] clone machine to explode the second of three bombs, accessing the [[green key]] that unlocks two further blocks. Move block 1 L and block 2 4L onto the [[brown button]], then push blocks 1 and 2 south to access a third block, which will explode the third of three bombs and eat Chip's keys in the process. With the way clear, remove the [[blue wall]]s guarding the glider and sneak into the exit. | ||
== Full level map == | |||
[[File:Cclp3_full_map_level_30.png|500px]] | |||
== Walkthrough == | == Walkthrough == | ||
{{#ev:youtube|cZqR7C6Ju-Q}} | |||
{{Level Progression|Tool Box|Bouncin' Blocks}} | {{Level Progression|Tool Box|Bouncin' Blocks}} | ||
Latest revision as of 02:19, 27 December 2020

| |
| Level set | Chip's Challenge Level Pack 3 |
|---|---|
| Level number | 30 |
| Designer | J.B. Lewis |
| Password | TSWV |
| Hint | The glider is your ticket out of here! Don't release it until the column of bombs is cleared. |
| Chips | 0 required / 0 available |
| Time limit | 300 |
| MS (Scores) | |
| Bold time | 232 |
| Public time | 232 |
| Casual difficulty | ***** |
| Bold execution difficulty |
***** |
| Bold routing difficulty |
***** |
| Bold luck difficulty |
***** |
| Lynx (Scores) | |
| Bold time | 232 |
| Public time | 232 |
| Casual difficulty | ***** |
| Bold execution difficulty |
***** |
| Bold routing difficulty |
***** |
| Bold luck difficulty |
***** |
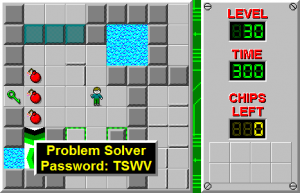
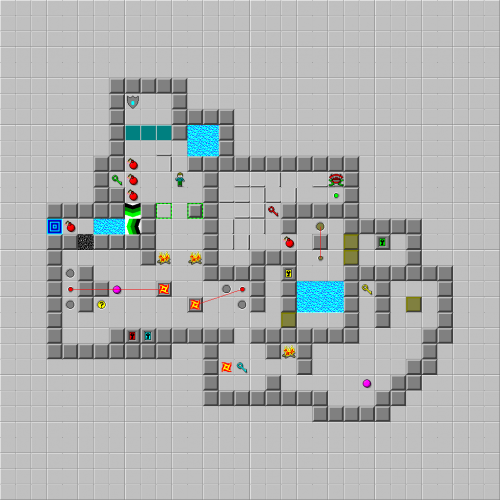
Problem Solver is the 30th level in Chip's Challenge Level Pack 3. It was created by J.B. Lewis. Several different puzzles are set up in a specific order, the main one being the four bombs in a glider's range where only the last one, guarding the exit, can be touched by it. The goals of the other three puzzles are to explode these three such that the fourth is removed by the glider. Begin in odd step, as part of the initial goal is to lure a teeth through a thin wall maze as soon as it starts moving. Move R [4] DL [3] UD, bringing the teeth around the first main corner, then eliminate one bomb by cloning at [10, 18] from [4, 18]. The correct clone machine must be used to explode the first bomb, but since the corresponding cloner is located on the same row as each button, this is based off simple logic. (The other logical pattern is usually in reading order, often reverse.) To pull the teeth around another corner, move to [15, 20] (above the blue key) and move (2R, 2L R) before collecting the key.
Walk past the pink ball and block its guard on the yellow key by placing the block 4D away, and use it to enter another room where the teeth can finally explode the bomb. Take the red key and switch the toggle walls, which allows the other fireball clone machine to explode the second of three bombs, accessing the green key that unlocks two further blocks. Move block 1 L and block 2 4L onto the brown button, then push blocks 1 and 2 south to access a third block, which will explode the third of three bombs and eat Chip's keys in the process. With the way clear, remove the blue walls guarding the glider and sneak into the exit.
Full level map[edit]
Walkthrough[edit]
| Previous Level | Current Level | Next Level |
|---|---|---|
| ← Tool Box | Problem Solver | Bouncin' Blocks → |
- Chip's Challenge Level Pack 3 Levels
- Levels designed by J.B. Lewis
- Levels with casual difficulty 2 (MS)
- Levels with bold execution difficulty 1 (MS)
- Levels with bold routing difficulty 2 (MS)
- Levels with casual difficulty 2 (Lynx)
- Levels with bold execution difficulty 1 (Lynx)
- Levels with bold routing difficulty 2 (Lynx)
