Please create an account or Login! Have fun!
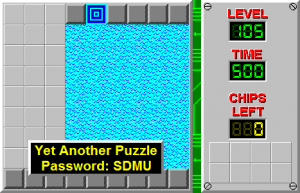
Yet Another Puzzle

| |
| Level set | Chip's Challenge Level Pack 2 |
|---|---|
| Level number | 105 |
| Designer | Eric Schmidt |
| Password | SDMU |
| Chips | 0 required / 0 available |
| Time limit | 500 |
| MS (Scores) | |
| Bold time | 200 |
| Public time | 200 |
| Casual difficulty | ***** |
| Bold execution difficulty |
***** |
| Bold routing difficulty |
***** |
| Bold luck difficulty |
***** |
| Lynx (Scores) | |
| Bold time | 194 |
| Public time | 182 |
| Casual difficulty | ***** |
| Bold execution difficulty |
***** |
| Bold routing difficulty |
***** |
| Bold luck difficulty |
***** |
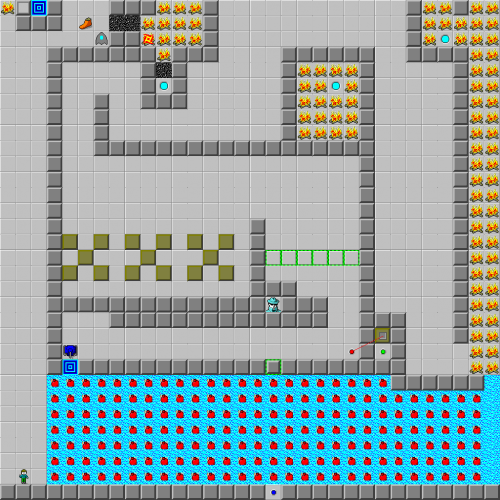
Yet Another Puzzle is the 105th level in Chip's Challenge Level Pack 2. In the level set where it came from, this was level 159, which explains the name. It's also worthy of a level slot that late: Yet Another Puzzle is a very hard puzzle, which will leave the player puzzled for an extremely long time as they try to fit all the blocks into the lower section.
Follow the open path and through the teleports to lead to a section with 3 Xs of 5 blocks apiece. As Chip will find out, he requires 14 blocks in order to reach the blue button and get back safely, as there are bombs under all the water spaces; however, only 13 blocks are usable. In addition, Chip has to get all those blocks he needs into the section between the toggle walls before he can push any of them into the water, and then he cannot go back. Therefore, many players will dismiss this level as impossible. However, because of the glider that is guarding the fire boots, Chip can indeed complete this level by using transparency: taking advantage of the fact that the game mechanics only support two layers per tile, a glider that passes over a water tile with another tile buried underneath will silently erase that buried tile.
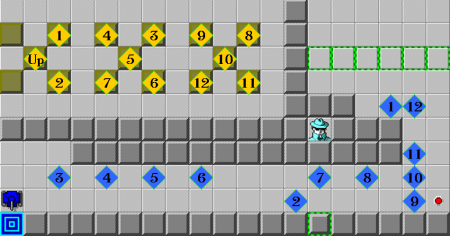
Pick up block 2 and move it R 2U, block 10 5U to match it, and then block 2 13R. Now, carry block 6 through the large maze, past the teleports and fireball, and then stick it in between the glider, which will cause it to deflect into the water pool and erase one of the bombs. Hurry in order to catch the glider; move the block back through both teleports, then onto the far right edge of the level and into the water at coordinate (31, 24), which deflects the glider over another bomb. Chip has now given up one of his 13 blocks, but now only 12 are required. Return to the Xs and move the blocks into these shown positions, in this specific order:
and now close the toggle walls. (The new block coordinates from here follow the numbers in the image.) Move blocks 9 and 2 directly to the water, sidle both 8 and 10 L, and then run block 11 into place, but before using it, pinch block 10 R. Now, finish 1, 10, and 12 on the right, and now move block 3 into place and take block 8 across to the right in the process. After using block 3, follow with block 8, and now take blocks 4 and 7, and then 5 and 6, to the water in the same way. Chip can now reverse the tank away from the exit to the west.
Full level map[edit]
Walkthrough[edit]
| Previous Level | Current Level | Next Level |
|---|---|---|
| ← Pyramid | Yet Another Puzzle | Bounce → |
- Chip's Challenge Level Pack 2 Levels
- Levels designed by Eric Schmidt
- Levels with casual difficulty 4 (MS)
- Levels with bold execution difficulty 1 (MS)
- Levels with bold routing difficulty 3 (MS)
- Levels with casual difficulty 4 (Lynx)
- Levels with bold execution difficulty 2 (Lynx)
- Levels with bold routing difficulty 4 (Lynx)
- Levels unplayable in Lynx

