Please create an account or Login! Have fun!
Block Away!: Difference between revisions
Tylersontag (talk | contribs) m (Tylersontag moved page block Away! to Block Away! over redirect: revert) |
mNo edit summary |
||
| (7 intermediate revisions by 3 users not shown) | |||
| Line 1: | Line 1: | ||
{{Infobox Level | {{Infobox Level | ||
|pack = cclp2 | |||
| | |||
|level = 21 | |level = 21 | ||
| | |image = [[File:CCLP2 Level 21.png|300px]] | ||
}} | |||
| | |||
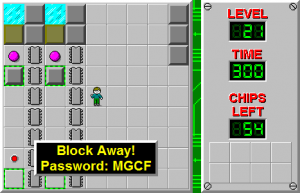
'''Block Away!''' is the 21st level in [[Chip's Challenge Level Pack 2]]. | |||
The chips are easy work: take the chips from the top, then zigzag up and down and move block 1 onto the [[green button]], then take the last column and then wipe out the last six chips in the sliding blocks above without waiting a single turn. Now, enter the left [[socket]], move >RLR R to one key, L >LRL and D 3R U to another red key, then L >LR RL >L and escape south to the [[tank]]s. The yellow key is not required. | |||
Take keys 1, 2, 4, 3 and 5 in order, waiting [1] for the last tank to avoid the Transparency Glitch. Finish by opening the socket to the furthest south and walk ''specifically'' 7L U 2L D to reach the exit. Without a [[level editor]], picking your way through this mound of locks is extremely difficult, and places this level far beyond its neighbors on the difficulty scale. | |||
==Fix for Lynx== | |||
Since the [[glider]]s from the cloner at (31, 12) will not die in the [[fire]] tile, these were changed to [[fireball]]s and a [[water]] tile in [[Chip's Challenge Level Pack 2 (Lynx)|CCLXP2]]. As for the pyramid of locks, stripes of [[blue wall]]s replaced the second stripe of the pyramid as well as the final stripe, and fake walls were placed accordingly to the original path. | |||
==Full level map== | |||
[[File:Cclp2_full_map_level_21.png|500px]] | |||
== Walkthrough == | == Walkthrough == | ||
Latest revision as of 04:29, 30 April 2020

| |
| Level set | Chip's Challenge Level Pack 2 |
|---|---|
| Level number | 21 |
| Designer | Dave Borgman |
| Password | MGCF |
| Chips | 54 required / 54 available |
| Time limit | 300 |
| MS (Scores) | |
| Bold time | 264 |
| Public time | 264 |
| Casual difficulty | ***** |
| Bold execution difficulty |
***** |
| Bold routing difficulty |
***** |
| Bold luck difficulty |
***** |
| Lynx (Scores) | |
| Bold time | 260 |
| Public time | 260 |
| Casual difficulty | ***** |
| Bold execution difficulty |
***** |
| Bold routing difficulty |
***** |
| Bold luck difficulty |
***** |
Block Away! is the 21st level in Chip's Challenge Level Pack 2.
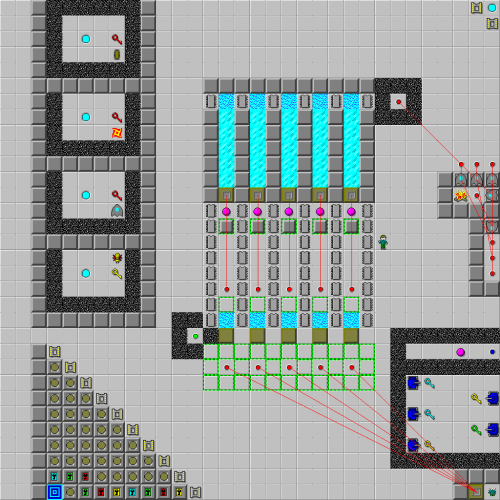
The chips are easy work: take the chips from the top, then zigzag up and down and move block 1 onto the green button, then take the last column and then wipe out the last six chips in the sliding blocks above without waiting a single turn. Now, enter the left socket, move >RLR R to one key, L >LRL and D 3R U to another red key, then L >LR RL >L and escape south to the tanks. The yellow key is not required.
Take keys 1, 2, 4, 3 and 5 in order, waiting [1] for the last tank to avoid the Transparency Glitch. Finish by opening the socket to the furthest south and walk specifically 7L U 2L D to reach the exit. Without a level editor, picking your way through this mound of locks is extremely difficult, and places this level far beyond its neighbors on the difficulty scale.
Fix for Lynx[edit]
Since the gliders from the cloner at (31, 12) will not die in the fire tile, these were changed to fireballs and a water tile in CCLXP2. As for the pyramid of locks, stripes of blue walls replaced the second stripe of the pyramid as well as the final stripe, and fake walls were placed accordingly to the original path.
Full level map[edit]
Walkthrough[edit]
| Previous Level | Current Level | Next Level |
|---|---|---|
| ← Ranger Denmark | Block Away! | How Goes? → |
- Chip's Challenge Level Pack 2 Levels
- Levels designed by Dave Borgman
- Levels with casual difficulty 3 (MS)
- Levels with bold execution difficulty 2 (MS)
- Levels with bold routing difficulty 2 (MS)
- Levels with casual difficulty 3 (Lynx)
- Levels with bold execution difficulty 2 (Lynx)
- Levels with bold routing difficulty 2 (Lynx)
- Levels unplayable in Lynx
