Please create an account or Login! Have fun!
Checkerboard I: Difference between revisions
Tylersontag (talk | contribs) m (Tylersontag moved page checkerboard I to Checkerboard I over redirect: revert) |
mNo edit summary |
||
| (13 intermediate revisions by 5 users not shown) | |||
| Line 1: | Line 1: | ||
{{Infobox Level | {{Infobox Level | ||
|pack = cclp2 | |||
| | |||
|level = 72 | |level = 72 | ||
| | |image = [[File:CCLP2 Level 72.png|300px]] | ||
| | |||
}} | }} | ||
'''Checkerboard I''' is the 72nd level in [[Chip's Challenge Level Pack 2 | '''Checkerboard I''' is the 72nd level in [[Chip's Challenge Level Pack 2]]. It is extremely likely that this level would be considered the ''single'' hardest level in CCLP2, or at the very least come in second to [[Cloner's Maze]]. Checkerboard I is almost impossible without assistance, and while a map is very helpful, it is still finger-breaking work to complete. | ||
The "checkerboard" contains 61 blocks | The "checkerboard" contains 61 blocks, which will easily not be enough if you attempt the level without a clear plan. If you do use a map, only 58 are required, but the quickest solutions do use all the blocks. Filling in the [[water]] located at (13, 3) and (11, 3) will save time, plus choosing which [[bomb]]s to destroy can make a difference. In total, 29 blocks are needed in the water section, 28 or 29 in the [[bomb]] section, two as extras for the water section, and one more block to explode a bomb located in front of the path to the exit. | ||
Counting one used block as one space (rather than conventional [[directional notation]]), follow these paths: build 3L across cell 3; 5L, 4U, 3L and 9D from water cell 6 through cells 5, 2, 1, 4 and 7; 5L and 2D through cells 9 and 8, and the last block will be taken onto the force floor and D 2R D 2R 8D to remove the bomb. In the bomb section, Chip builds 6D through cells 1 and 4, simply D to access the top half of cell 2, and then through cells 3 and 6 to several forks: cell 9 builds 4D, and cell 5 builds 4L, then first 2U into the bottom half of cell 2 and then 2D 5L through cells 8 and 7. | Counting one used block as one space (rather than conventional [[directional notation]]), follow these paths: build 3L across cell 3; 5L, 4U, 3L and 9D from water cell 6 through cells 5, 2, 1, 4 and 7; 5L and 2D through cells 9 and 8, and the last block will be taken onto the force floor and D 2R D 2R 8D to remove the bomb. In the bomb section, Chip builds 6D through cells 1 and 4, simply D to access the top half of cell 2, and then through cells 3 and 6 to several forks: cell 9 builds 4D, and cell 5 builds 4L, then first 2U into the bottom half of cell 2 and then 2D 5L through cells 8 and 7. | ||
Chip must watch out for shortcuts through [[blue wall]]s, [[Mixed Nuts]]-style block pushing and other diagonal arrangements, and removing some blue walls in the checkerboard to make other blocks move faster. The full 451 route is shown, | Chip must watch out for shortcuts through [[blue wall]]s, [[Mixed Nuts]]-style block pushing and other diagonal arrangements, and removing some blue walls in the checkerboard to make other blocks move faster. The full 451 route is shown in the [[AVI]] below, and a 452 can be found at the [[public TWS]]. A 453 route has also been found, and some of the details about it can be found in the Trivia section below. | ||
== Fix for Lynx == | |||
The [[boot]]s hidden under the [[socket]]s and the fake [[suction boots]] on (14, 17) are the only barriers to [[Lynx ruleset|Lynx]] play. In [[Chip's Challenge Level Pack 2 (Lynx)|CCLXP2]], the fake suction boots had invisible walls placed L and D off of them, and the sockets had flippers and fire boots hidden under blocks next to them. | |||
== Trivia == | |||
*The record for this level went unconfirmed for 11 and a half years, or 4204 days. It was the longest unconfirmed record at the time. The public solution was missing two seconds, but a new route was released that is only missing one second. The final second can be discovered by finding two separate improvements on the block pushing. The first improvement of [2] has to do with how to clear the last fake blue walls in the upper area without losing any time, and the other [2] are not in the large block room at all. These are both tricks that should not be too difficult to spot as the trickiest optimization in the level is already shown, namely how to best get all the blocks through the two doors that are in the SW corner of the block room. | |||
==Full level map== | |||
[[File:Cclp2_full_map_level_72.png|500px]] | |||
== Walkthrough == | == Walkthrough == | ||
{{#ev:youtube| | {{#ev:youtube|lzo5WoWfcEI}} | ||
{{Level Progression|Mads' Rush II|Bumble Boy}} | {{Level Progression|Mads' Rush II|Bumble Boy}} | ||
[[Category:Levels unplayable in Lynx]] | [[Category:Levels unplayable in Lynx]] | ||
Latest revision as of 04:42, 30 April 2020

| |
| Level set | Chip's Challenge Level Pack 2 |
|---|---|
| Level number | 72 |
| Designer | Dale Bryan |
| Password | IXWO |
| Chips | 72 required / 72 available |
| Time limit | 999 |
| MS (Scores) | |
| Bold time | 453 |
| Public time | 452 |
| Casual difficulty | ***** |
| Bold execution difficulty |
***** |
| Bold routing difficulty |
***** |
| Bold luck difficulty |
***** |
| Lynx (Scores) | |
| Bold time | 444 |
| Public time | 434 |
| Casual difficulty | ***** |
| Bold execution difficulty |
***** |
| Bold routing difficulty |
***** |
| Bold luck difficulty |
***** |
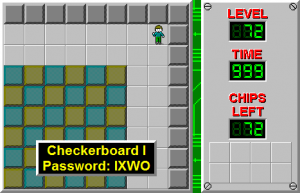
Checkerboard I is the 72nd level in Chip's Challenge Level Pack 2. It is extremely likely that this level would be considered the single hardest level in CCLP2, or at the very least come in second to Cloner's Maze. Checkerboard I is almost impossible without assistance, and while a map is very helpful, it is still finger-breaking work to complete.
The "checkerboard" contains 61 blocks, which will easily not be enough if you attempt the level without a clear plan. If you do use a map, only 58 are required, but the quickest solutions do use all the blocks. Filling in the water located at (13, 3) and (11, 3) will save time, plus choosing which bombs to destroy can make a difference. In total, 29 blocks are needed in the water section, 28 or 29 in the bomb section, two as extras for the water section, and one more block to explode a bomb located in front of the path to the exit.
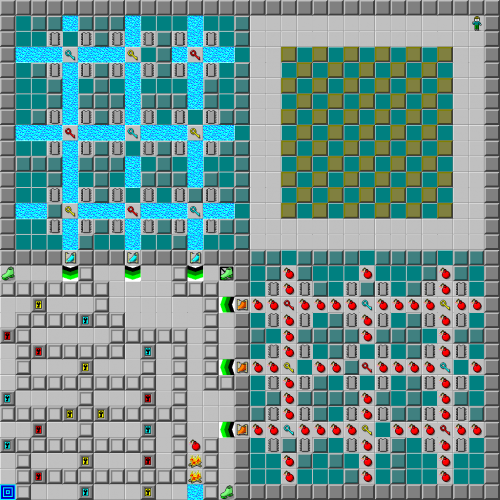
Counting one used block as one space (rather than conventional directional notation), follow these paths: build 3L across cell 3; 5L, 4U, 3L and 9D from water cell 6 through cells 5, 2, 1, 4 and 7; 5L and 2D through cells 9 and 8, and the last block will be taken onto the force floor and D 2R D 2R 8D to remove the bomb. In the bomb section, Chip builds 6D through cells 1 and 4, simply D to access the top half of cell 2, and then through cells 3 and 6 to several forks: cell 9 builds 4D, and cell 5 builds 4L, then first 2U into the bottom half of cell 2 and then 2D 5L through cells 8 and 7.
Chip must watch out for shortcuts through blue walls, Mixed Nuts-style block pushing and other diagonal arrangements, and removing some blue walls in the checkerboard to make other blocks move faster. The full 451 route is shown in the AVI below, and a 452 can be found at the public TWS. A 453 route has also been found, and some of the details about it can be found in the Trivia section below.
Fix for Lynx[edit]
The boots hidden under the sockets and the fake suction boots on (14, 17) are the only barriers to Lynx play. In CCLXP2, the fake suction boots had invisible walls placed L and D off of them, and the sockets had flippers and fire boots hidden under blocks next to them.
Trivia[edit]
- The record for this level went unconfirmed for 11 and a half years, or 4204 days. It was the longest unconfirmed record at the time. The public solution was missing two seconds, but a new route was released that is only missing one second. The final second can be discovered by finding two separate improvements on the block pushing. The first improvement of [2] has to do with how to clear the last fake blue walls in the upper area without losing any time, and the other [2] are not in the large block room at all. These are both tricks that should not be too difficult to spot as the trickiest optimization in the level is already shown, namely how to best get all the blocks through the two doors that are in the SW corner of the block room.
Full level map[edit]
Walkthrough[edit]
| Previous Level | Current Level | Next Level |
|---|---|---|
| ← Mads' Rush II | Checkerboard I | Bumble Boy → |
- Chip's Challenge Level Pack 2 Levels
- Levels designed by Dale Bryan
- Levels with casual difficulty 5 (MS)
- Levels with bold execution difficulty 3 (MS)
- Levels with bold routing difficulty 5 (MS)
- Levels with casual difficulty 5 (Lynx)
- Levels with bold execution difficulty 4 (Lynx)
- Levels with bold routing difficulty 5 (Lynx)
- Levels unplayable in Lynx
