Please create an account or Login! Have fun!
Glider and Fire: Difference between revisions
imported>Ihavenoname248 No edit summary |
mNo edit summary |
||
| (10 intermediate revisions by 5 users not shown) | |||
| Line 1: | Line 1: | ||
{{Infobox Level | {{Infobox Level | ||
|pack = cclp2 | |||
| | |||
|level = 96 | |level = 96 | ||
| | |image = [[File:CCLP2 Level 96.png|300px]] | ||
| | |||
}} | }} | ||
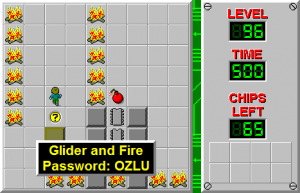
'''Glider and Fire''' is the 96th level in [[Chip's Challenge Level Pack 2]]. | '''Glider and Fire''' is the 96th level in [[Chip's Challenge Level Pack 2]]. This level requires [[Chip]] to direct [[glider]]s safely through areas of [[fire]] in order to remove the [[bomb]]s in front of all the chips. The challenge is that there is a limited supply of [[block]]s to do this job; Chip cannot waste them. The cloning gliders require a sense of timing to negotiate safely; if Chip does not know what he is doing, he can easily be hit even by the most obvious attacks. | ||
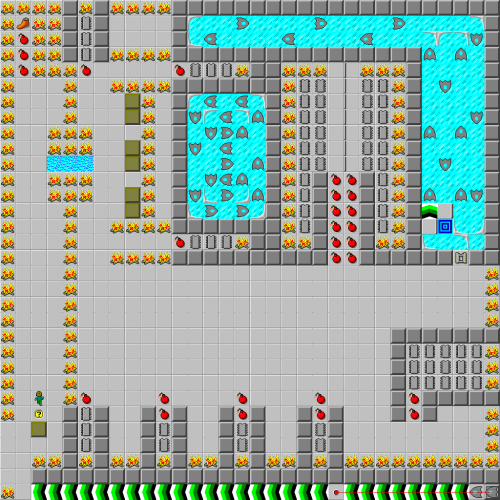
Knock the block into the corner to redirect the gliders onto the three bombs for the [[fire boots]], then move right to the six blocks. Move block 1 2L, block 2 8L 3D, block 4 L, and then block 3 7L, which directs the gliders to the top. Clear block 1 UL out of the way, then take the first three chips, move the block 2R D and take the other three, and now pick the block up again to redirect the gliders south with 4D 2L. | Knock the block into the corner to redirect the gliders onto the three bombs for the [[fire boots]], then move right to the six blocks. Move block 1 2L, block 2 8L 3D, block 4 L, and then block 3 7L, which directs the gliders to the top. Clear block 1 UL out of the way, then take the first three chips, move the block 2R D and take the other three, and now pick the block up again to redirect the gliders south with 4D 2L. | ||
| Line 27: | Line 11: | ||
Move block 5 R 2D, then block 6 3D 2L, which will cause the glider stream to temporarily turn to the right and explode this bomb. Shift the block R out of the way to allow it to continue south, then continue moving it 9D to redirect the gliders west. Collect these chips, then move the block again outwards 4R to prepare for another explosion, and now go north. Pick up the chips and throw this block 10D and R to explode this bomb, and continue to throw it R to allow the gliders away from the chips as you score them. To collect the next two chips, move the bottom block and then the top block 5R, but on the next bomb, move the top block 6R instead and leave the chips behind. Throw both blocks R, then use the first block on the bombs to the right, and go back and collect the two chips left behind. | Move block 5 R 2D, then block 6 3D 2L, which will cause the glider stream to temporarily turn to the right and explode this bomb. Shift the block R out of the way to allow it to continue south, then continue moving it 9D to redirect the gliders west. Collect these chips, then move the block again outwards 4R to prepare for another explosion, and now go north. Pick up the chips and throw this block 10D and R to explode this bomb, and continue to throw it R to allow the gliders away from the chips as you score them. To collect the next two chips, move the bottom block and then the top block 5R, but on the next bomb, move the top block 6R instead and leave the chips behind. Throw both blocks R, then use the first block on the bombs to the right, and go back and collect the two chips left behind. | ||
At last, sidle the block R and take the chips on the very top side, first left and then right, as the gliders clear it out. Now, use the other block below to reach the remaining chips, open the [[socket]], then play U [1] U, sliding with the gliders to | At last, sidle the block R and take the chips on the very top side, first left and then right, as the gliders clear it out. Now, use the other block below to reach the remaining chips, open the [[socket]], then play U [1] U, sliding with the gliders to the [[exit]]. | ||
==Fix for Lynx== | |||
As the gliders will not be destroyed by fire in [[Lynx ruleset|Lynx]], it is considerably tougher to solve the level while it fills up with enemies. For [[Chip's Challenge Level Pack 2 (Lynx)|CCLXP2]], however, this level is completely unchanged; and as a result, the most optimal solution in Lynx is 3 seconds quicker than the fastest solution in MS. A horizontally mirrored variant of the level titled ''Fireball and Water'' was considered, but it was ultimately decided against as the blocks would interact with the water differently than they would interact with the fire. | |||
==Full level map== | |||
[[File:Cclp2_full_map_level_96.png|500px]] | |||
== Walkthrough == | == Walkthrough == | ||
{{#ev:youtube|_J3B65hpMuQ}} | |||
{{Level Progression|Learn|Roller Coaster}} | {{Level Progression|Learn|Roller Coaster}} | ||
[[Category:Levels quicker in Lynx than MS]] | [[Category:Levels quicker in Lynx than MS]] | ||
Latest revision as of 04:48, 30 April 2020

| |
| Level set | Chip's Challenge Level Pack 2 |
|---|---|
| Level number | 96 |
| Designer | Rolf Redford |
| Password | OZLU |
| Chips | 65 required / 65 available |
| Time limit | 500 |
| MS (Scores) | |
| Bold time | 398 |
| Public time | 398 |
| Casual difficulty | ***** |
| Bold execution difficulty |
***** |
| Bold routing difficulty |
***** |
| Bold luck difficulty |
***** |
| Lynx (Scores) | |
| Bold time | 407 |
| Public time | 401 |
| Casual difficulty | ***** |
| Bold execution difficulty |
***** |
| Bold routing difficulty |
***** |
| Bold luck difficulty |
***** |
Glider and Fire is the 96th level in Chip's Challenge Level Pack 2. This level requires Chip to direct gliders safely through areas of fire in order to remove the bombs in front of all the chips. The challenge is that there is a limited supply of blocks to do this job; Chip cannot waste them. The cloning gliders require a sense of timing to negotiate safely; if Chip does not know what he is doing, he can easily be hit even by the most obvious attacks.
Knock the block into the corner to redirect the gliders onto the three bombs for the fire boots, then move right to the six blocks. Move block 1 2L, block 2 8L 3D, block 4 L, and then block 3 7L, which directs the gliders to the top. Clear block 1 UL out of the way, then take the first three chips, move the block 2R D and take the other three, and now pick the block up again to redirect the gliders south with 4D 2L.
Move block 5 R 2D, then block 6 3D 2L, which will cause the glider stream to temporarily turn to the right and explode this bomb. Shift the block R out of the way to allow it to continue south, then continue moving it 9D to redirect the gliders west. Collect these chips, then move the block again outwards 4R to prepare for another explosion, and now go north. Pick up the chips and throw this block 10D and R to explode this bomb, and continue to throw it R to allow the gliders away from the chips as you score them. To collect the next two chips, move the bottom block and then the top block 5R, but on the next bomb, move the top block 6R instead and leave the chips behind. Throw both blocks R, then use the first block on the bombs to the right, and go back and collect the two chips left behind.
At last, sidle the block R and take the chips on the very top side, first left and then right, as the gliders clear it out. Now, use the other block below to reach the remaining chips, open the socket, then play U [1] U, sliding with the gliders to the exit.
Fix for Lynx[edit]
As the gliders will not be destroyed by fire in Lynx, it is considerably tougher to solve the level while it fills up with enemies. For CCLXP2, however, this level is completely unchanged; and as a result, the most optimal solution in Lynx is 3 seconds quicker than the fastest solution in MS. A horizontally mirrored variant of the level titled Fireball and Water was considered, but it was ultimately decided against as the blocks would interact with the water differently than they would interact with the fire.
Full level map[edit]
Walkthrough[edit]
| Previous Level | Current Level | Next Level |
|---|---|---|
| ← Learn | Glider and Fire | Roller Coaster → |
- Chip's Challenge Level Pack 2 Levels
- Levels designed by Rolf Redford
- Levels with casual difficulty 3 (MS)
- Levels with bold execution difficulty 1 (MS)
- Levels with bold routing difficulty 3 (MS)
- Levels with casual difficulty 4 (Lynx)
- Levels with bold execution difficulty 3 (Lynx)
- Levels with bold routing difficulty 4 (Lynx)
- Levels quicker in Lynx than MS
