Trapped: Difference between revisions
m ((via JWB)) |
mNo edit summary |
||
| (2 intermediate revisions by 2 users not shown) | |||
| Line 1: | Line 1: | ||
{{Infobox Level | {{Infobox Level | ||
|pack = cclp2 | |||
| | |||
|level = 143 | |level = 143 | ||
| | |image = [[File:CCLP2 Level 143.png|300px]] | ||
| | |||
}} | }} | ||
| Line 27: | Line 11: | ||
The [[No boost route]] is shown in the second video, and involves many analytical struggles including a [[walker]] [[clone machine]] which removes several [[bomb]]s out of the way, and a small alcove of [[tank]]s which start to change after [[blue lock]]s are opened. | The [[No boost route]] is shown in the second video, and involves many analytical struggles including a [[walker]] [[clone machine]] which removes several [[bomb]]s out of the way, and a small alcove of [[tank]]s which start to change after [[blue lock]]s are opened. | ||
==Full level map== | == Full level map == | ||
[[ | [[File:Cclp2_full_map_level_143.png|500px]] | ||
== Walkthrough == | == Walkthrough == | ||
{{#ev:youtube|a8mCJD2F3vE}} | {{#ev:youtube|a8mCJD2F3vE}} | ||
{{#ev:youtube|zJcSZEGZczc}} | {{#ev:youtube|zJcSZEGZczc}} | ||
| Line 38: | Line 21: | ||
* [[Trust Me]] | * [[Trust Me]] | ||
* [[Magic Trick]] | * [[Magic Trick]] | ||
{{Level Progression|Chomper Romp|Wormwood}} | {{Level Progression|Chomper Romp|Wormwood}} | ||
Latest revision as of 05:00, 30 April 2020
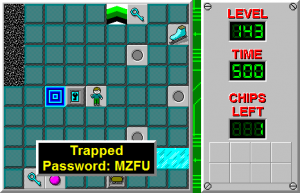
Trapped is the 143rd level in Chip's Challenge Level Pack 2. An apparently long journey can be massively cut short by exploiting a Controller and Boss Glitch-related bust. This is the only Controller and Boss Glitch-related bust in CCLP2. The paramecium in the clone machine just below Chip has a blob for a boss, which has to move east to clone the paramecium. The route, therefore, will not work every time, and it's likely in a minority chance, but it's a very fast route. Keep playing 2R 6D (4R) 3U R 7L.

| |
| Level set | Chip's Challenge Level Pack 2 |
|---|---|
| Level number | 143 |
| Designer | Tyrethali Ansrath |
| Password | MZFU |
| Chips | 1 required / 2 available |
| Chips notes | 2 inaccessible, not required to complete level |
| Time limit | 500 |
| MS (Scores) | |
| Bold time | 495 |
| Public time | 495 |
| Casual difficulty | ***** |
| Bold execution difficulty |
***** |
| Bold routing difficulty |
***** |
| Bold luck difficulty |
***** |
| Lynx (Scores) | |
| Bold time | 445 |
| Public time | 445 |
| Casual difficulty | ***** |
| Bold execution difficulty |
***** |
| Bold routing difficulty |
***** |
| Bold luck difficulty |
***** |
This level was made by Tyrethali Ansrath, who was one of the very earliest level designers; this is the likely reason as to why Trapped, the main bust due to the C/B Glitch in CCLP2 (the other only gains one second), remained uncaught until the release of the levelset.
The No boost route is shown in the second video, and involves many analytical struggles including a walker clone machine which removes several bombs out of the way, and a small alcove of tanks which start to change after blue locks are opened.
Full level mapEdit
WalkthroughEdit
See AlsoEdit
| Previous Level | Current Level | Next Level |
|---|---|---|
| ← Chomper Romp | Trapped | Wormwood → |