Please create an account or Login! Have fun!
Abandoned Mines: Difference between revisions
Indyindeed (talk | contribs) mNo edit summary |
mNo edit summary |
||
| (8 intermediate revisions by 2 users not shown) | |||
| Line 1: | Line 1: | ||
{{Infobox Level | {{Infobox Level | ||
|pack = cclp2 | |||
| | |||
|level = 92 | |level = 92 | ||
| | |image = [[File:CCLP2 Level 92.png|300px]] | ||
| | |||
}} | }} | ||
'''Abandoned Mines''' is the 92nd level in [[Chip's Challenge Level Pack 2]]. This level is quite easy to complete if [[Chip]] simply sits around and waits for the obstacles, or walks around the [[teeth]]; the hard part, of course, is scoring high. [[Odd step]] is required for this route. | '''Abandoned Mines''' is the 92nd level in [[Chip's Challenge Level Pack 2]]. This level is quite easy to complete if [[Chip]] simply sits around and waits for the obstacles, or walks around the [[teeth]]; the hard part, of course, is scoring high. Fortunately, the [[bold time]] is 459.8 - meaning up to [4] can be dropped and the bold can still be achieved. [[Odd step]] is required for this route. | ||
Clear out the first [[blue wall]] on the right, and then steal the chips from the [[bug]]s in a general clockwise direction: start with three in the chain of five, then the one to the south, the one to the west, the one to the north, then the first six in the chain of nine, the chip on the right, and finally the other three. | Clear out the first [[blue wall]] on the right, and then steal the [[Computer chip|chips]] from the [[bug]]s in a general clockwise direction: start with three in the chain of five, then the one to the south, the one to the west, the one to the north, then the first six in the chain of nine, the chip on the right, and finally the other three. Now, try to steal the [[flippers]], and now follow LULU 2R U, which will hopefully allow Chip to sneak through the [[blob]]s. Up to [1] can be dropped in this section due to an upcoming teeth section; losing more time will mean more precision will be required in the upcoming [[boosting]] section. | ||
Follow the force floors, move up over the first west force floor, take the four chips, and continue moving through the maze. To make this section slightly easier, move L and >[D 2R] D off the last chip instead of the rapid-fire 2D boost, as Chip can stand the loss of [1] due to an upcoming teeth section. Take the first chip on the left, waste the spare move if Chip hasn't yet, and then collect the other three chips east, south, and west. Move D, then [1] for the released teeth and slide through the force floors, which ''just'' sneaks past the teeth as they charge northwards. | |||
Now Chip will move into a section with opposing force floors against each other. This is by far the hardest part of quick Abandoned Mines play, though it is made easier by the [4] of leeway assuming the player is on track for 459.8. Off the [[ice]] space, the correct route through is L 2D [1/2] L 2D 2R 2D [1/2] L 3R 2U [1/2] R 2U LUDL 2U [1/2] R 2L U, and then slide to the [[exit]]. | |||
==Fix for Lynx== | |||
The force floor section at the bottom of the level is unsolvable in [[Lynx ruleset|Lynx]], as force floors do not allow backwards overrides in this ruleset. In [[Chip's Challenge Level Pack 2 (Lynx)|CCLXP2]], the force floor section was redesigned into a checkerboard of force floors facing east and facing west to allow passage to the chips. | |||
==Full level map== | ==Full level map== | ||
[[ | [[File:Cclp2 full map level 92.png|500px]] | ||
== Walkthrough == | == Walkthrough == | ||
{{#ev:youtube| | {{#ev:youtube|Lb2DjJUydnc}} | ||
{{Level Progression|Tutti-Frutti|Exit Chip}} | {{Level Progression|Tutti-Frutti|Exit Chip}} | ||
[[Category:Levels unsolvable in Lynx]] | [[Category:Levels unsolvable in Lynx]] | ||
Latest revision as of 04:47, 30 April 2020

| |
| Level set | Chip's Challenge Level Pack 2 |
|---|---|
| Level number | 92 |
| Designer | Tyrethali Ansrath |
| Password | NNDI |
| Chips | 38 required / 38 available |
| Time limit | 500 |
| MS (Scores) | |
| Bold time | 459 |
| Public time | 459 |
| Casual difficulty | ***** |
| Bold execution difficulty |
***** |
| Bold routing difficulty |
***** |
| Bold luck difficulty |
***** |
| Lynx (Scores) | |
| Bold time | 453 |
| Public time | 453 |
| Casual difficulty | ***** |
| Bold execution difficulty |
***** |
| Bold routing difficulty |
***** |
| Bold luck difficulty |
***** |
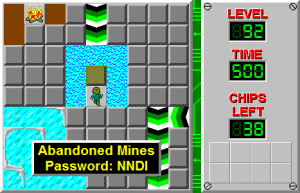
Abandoned Mines is the 92nd level in Chip's Challenge Level Pack 2. This level is quite easy to complete if Chip simply sits around and waits for the obstacles, or walks around the teeth; the hard part, of course, is scoring high. Fortunately, the bold time is 459.8 - meaning up to [4] can be dropped and the bold can still be achieved. Odd step is required for this route.
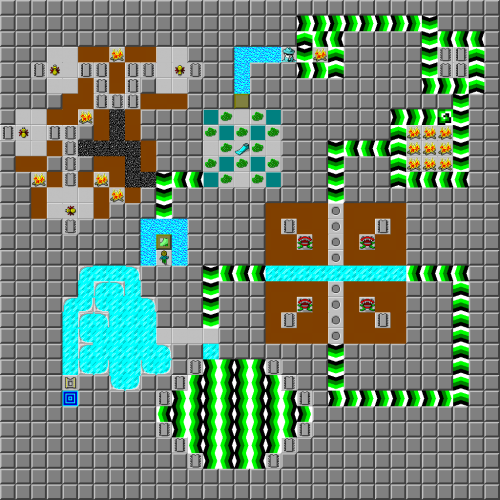
Clear out the first blue wall on the right, and then steal the chips from the bugs in a general clockwise direction: start with three in the chain of five, then the one to the south, the one to the west, the one to the north, then the first six in the chain of nine, the chip on the right, and finally the other three. Now, try to steal the flippers, and now follow LULU 2R U, which will hopefully allow Chip to sneak through the blobs. Up to [1] can be dropped in this section due to an upcoming teeth section; losing more time will mean more precision will be required in the upcoming boosting section.
Follow the force floors, move up over the first west force floor, take the four chips, and continue moving through the maze. To make this section slightly easier, move L and >[D 2R] D off the last chip instead of the rapid-fire 2D boost, as Chip can stand the loss of [1] due to an upcoming teeth section. Take the first chip on the left, waste the spare move if Chip hasn't yet, and then collect the other three chips east, south, and west. Move D, then [1] for the released teeth and slide through the force floors, which just sneaks past the teeth as they charge northwards.
Now Chip will move into a section with opposing force floors against each other. This is by far the hardest part of quick Abandoned Mines play, though it is made easier by the [4] of leeway assuming the player is on track for 459.8. Off the ice space, the correct route through is L 2D [1/2] L 2D 2R 2D [1/2] L 3R 2U [1/2] R 2U LUDL 2U [1/2] R 2L U, and then slide to the exit.
Fix for Lynx[edit]
The force floor section at the bottom of the level is unsolvable in Lynx, as force floors do not allow backwards overrides in this ruleset. In CCLXP2, the force floor section was redesigned into a checkerboard of force floors facing east and facing west to allow passage to the chips.
Full level map[edit]
Walkthrough[edit]
| Previous Level | Current Level | Next Level |
|---|---|---|
| ← Tutti-Frutti | Abandoned Mines | Exit Chip → |
- Chip's Challenge Level Pack 2 Levels
- Levels designed by Tyrethali Ansrath
- Levels with casual difficulty 3 (MS)
- Levels with bold execution difficulty 5 (MS)
- Levels with bold routing difficulty 3 (MS)
- Levels with luck rating 2 (MS)
- Levels with casual difficulty 3 (Lynx)
- Levels with bold execution difficulty 4 (Lynx)
- Levels with bold routing difficulty 2 (Lynx)
- Levels with luck rating 2 (Lynx)
- Levels unsolvable in Lynx
