Please create an account or Login! Have fun!
Island Hopping: Difference between revisions
Tylersontag (talk | contribs) m (Tylersontag moved page island Hopping to Island Hopping over redirect: revert) |
mNo edit summary |
||
| (7 intermediate revisions by 3 users not shown) | |||
| Line 1: | Line 1: | ||
{{Infobox Level | {{Infobox Level | ||
|pack = cclp2 | |||
| | |||
|level = 103 | |level = 103 | ||
| | |image = [[File:CCLP2 Level 103.png|300px]] | ||
| | |||
}} | }} | ||
'''Island Hopping''' is the 103rd level in [[Chip's Challenge Level Pack 2]]. As is obvious, Chip has to swim around the level, collecting chips from | '''Island Hopping''' is the 103rd level in [[Chip's Challenge Level Pack 2]]. As is obvious, [[Chip]] has to swim around the level, collecting [[Computer chip|chips]] from various scattered obstacles. However, the [[glider]]s in the room near the northeast allow Chip to exploit a [[bust]] that allows him to remove the [[bomb]]s in the southeast using them, when it was intended for him to simply steal the tools from the gliders and use the [[clone block]] to blow up the bombs. | ||
Unfortunately for bold-seekers, Chip has to synchronize the [[brown button]]s properly to allow him to direct the gliders where he wants them, and to do that, Chip has to release the [[toggle wall]]s at the ''exact'' moment, complicated by the addition of random [[force floor]]s in the way of the [[green button]], and the requirement that Chip dash out of that random force floor room with almost perfect luck. [[Andrew Bennett]] simplified this method into the following strategy, which was recorded to be noticably more successful. | Unfortunately for [[Bold time|bold]]-seekers, Chip has to synchronize the [[brown button]]s properly to allow him to direct the gliders where he wants them, and to do that, Chip has to release the [[toggle wall]]s at the ''exact'' right moment, which is made very complicated by the addition of random [[force floor]]s in the way of the [[green button]], ''and'' the requirement that Chip dash out of that random force floor room with almost perfect luck. [[Andrew Bennett]] simplified this method into the following strategy, which was recorded to be noticably more successful. | ||
The requirement is to lose [3] over a perfect run up to the green button, then to come out of the room losing at most [1], and thus taking the nearby chip while the timer is still at 491. A good way to lose [1] is not to use the [[spring slide]] path of L 2D off the first chip near the [[ice]], and instead move straight down. | The requirement is to lose [3] over a perfect run up to the green button, then to come out of the room losing at most [1], and thus taking the nearby chip while the timer is still at 491. A good way to lose [1] is not to use the [[spring slide]] path of L 2D off the first chip near the [[ice]], and instead move straight down. | ||
Now, step into the room and see which way Chip moves. A DLU detour is worth [1] off; in total, Chip must move over ''seven'' force floors before he touches the button. Now, move either U or R, and continue to jump towards the opposite end at the northeast. If Chip reaches the chip on time, and the [[pink ball]] up past the four chips is specifically 2U from him as he enters, he will score the bold if his execution is correct the remainder of the way out. | Now, step into the room and see which way Chip moves. A DLU detour is worth [1] off; in total, Chip must move over ''seven'' force floors before he touches the button. Now, move either U or R, and continue to jump towards the opposite end at the northeast. If Chip reaches the chip on time, and the [[pink ball]] up past the four chips is specifically 2U from him as he enters, he will score the bold if his execution is correct the remainder of the way out. | ||
==Fix for Lynx== | |||
The [[blue key]] is erased by a [[pink ball]] once the level starts, so the level is not solvable in [[Lynx ruleset|Lynx]]. In [[Chip's Challenge Level Pack 2 (Lynx)|CCLXP2]], the [[Red key|red]] and blue keys and [[lock]]s had their colors swapped and the [[tank]] section was changed a bit to work in both [[ruleset]]s. A west [[thin wall]] was added at (4, 20) and a [[trap]] was added at (6, 21) with a [[Brown button|button]] constantly being held down by a block that can never be pushed at (9, 17). This trap synchronizes the behavior of the tanks due to [[trap sliding]], and also has no effect on gameplay in [[MS ruleset|MS]] because open traps behave exactly like [[floor]] tiles. | |||
== | ==Full level map== | ||
[[File:Cclp2_full_map_level_103.png|500px]] | |||
== Walkthrough == | == Walkthrough == | ||
Latest revision as of 04:49, 30 April 2020

| |
| Level set | Chip's Challenge Level Pack 2 |
|---|---|
| Level number | 103 |
| Designer | Paul Hobden |
| Password | SWKX |
| Chips | 30 required / 30 available |
| Time limit | 500 |
| MS (Scores) | |
| Bold time | 393 |
| Public time | 392 |
| Casual difficulty | ***** |
| Bold execution difficulty |
***** |
| Bold routing difficulty |
***** |
| Bold luck difficulty |
***** |
| Lynx (Scores) | |
| Bold time | 385 |
| Public time | 378 |
| Casual difficulty | ***** |
| Bold execution difficulty |
***** |
| Bold routing difficulty |
***** |
| Bold luck difficulty |
***** |
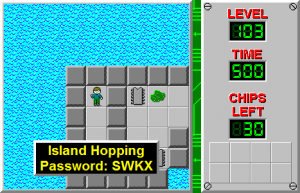
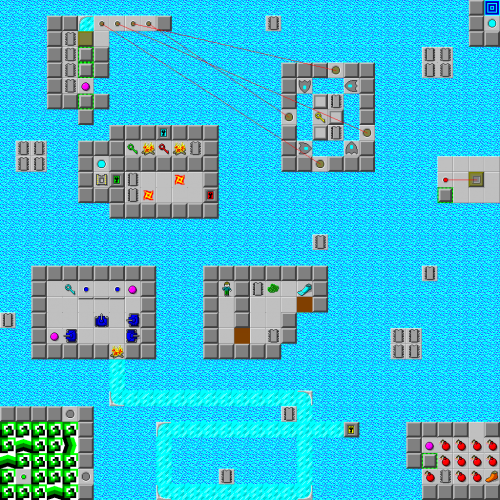
Island Hopping is the 103rd level in Chip's Challenge Level Pack 2. As is obvious, Chip has to swim around the level, collecting chips from various scattered obstacles. However, the gliders in the room near the northeast allow Chip to exploit a bust that allows him to remove the bombs in the southeast using them, when it was intended for him to simply steal the tools from the gliders and use the clone block to blow up the bombs.
Unfortunately for bold-seekers, Chip has to synchronize the brown buttons properly to allow him to direct the gliders where he wants them, and to do that, Chip has to release the toggle walls at the exact right moment, which is made very complicated by the addition of random force floors in the way of the green button, and the requirement that Chip dash out of that random force floor room with almost perfect luck. Andrew Bennett simplified this method into the following strategy, which was recorded to be noticably more successful.
The requirement is to lose [3] over a perfect run up to the green button, then to come out of the room losing at most [1], and thus taking the nearby chip while the timer is still at 491. A good way to lose [1] is not to use the spring slide path of L 2D off the first chip near the ice, and instead move straight down.
Now, step into the room and see which way Chip moves. A DLU detour is worth [1] off; in total, Chip must move over seven force floors before he touches the button. Now, move either U or R, and continue to jump towards the opposite end at the northeast. If Chip reaches the chip on time, and the pink ball up past the four chips is specifically 2U from him as he enters, he will score the bold if his execution is correct the remainder of the way out.
Fix for Lynx[edit]
The blue key is erased by a pink ball once the level starts, so the level is not solvable in Lynx. In CCLXP2, the red and blue keys and locks had their colors swapped and the tank section was changed a bit to work in both rulesets. A west thin wall was added at (4, 20) and a trap was added at (6, 21) with a button constantly being held down by a block that can never be pushed at (9, 17). This trap synchronizes the behavior of the tanks due to trap sliding, and also has no effect on gameplay in MS because open traps behave exactly like floor tiles.
Full level map[edit]
Walkthrough[edit]
| Previous Level | Current Level | Next Level |
|---|---|---|
| ← Chip's Fight | Island Hopping | Pyramid → |
- Chip's Challenge Level Pack 2 Levels
- Levels designed by Paul Hobden
- Levels with casual difficulty 3 (MS)
- Levels with bold execution difficulty 2 (MS)
- Levels with bold routing difficulty 4 (MS)
- Levels with luck rating 4 (MS)
- Levels with casual difficulty 3 (Lynx)
- Levels with bold execution difficulty 2 (Lynx)
- Levels with bold routing difficulty 4 (Lynx)
- Levels unsolvable in Lynx
