Please create an account or Login! Have fun!
Lesson 5: Difference between revisions
Jump to navigation
Jump to search
m ((via JWB)) |
Sharpeye468 (talk | contribs) m (Updated to new level template) |
||
| Line 1: | Line 1: | ||
{{Distinguish|Lesson 5 (CC2 level)}} | {{Distinguish|Lesson 5 (CC2 level)}} | ||
{{Infobox Level | {{Infobox Level | ||
|pack = cc1 | |||
| | |||
|level = 5 | |level = 5 | ||
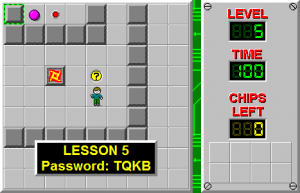
| | |image = [[File:Level_5.png|300px]] | ||
|hint = The [[red button]] controls the [[clone machine]]. The [[brown button]] opens [[trap]]s. | |hint = The [[red button]] controls the [[clone machine]]. The [[brown button]] opens [[trap]]s. | ||
}} | |||
'''Lesson 5''' is the fifth level in [[Chip's Challenge 1]]. This [[lesson level]] teaches [[Chip]] about more dangerous and difficult obstacles: [[clone machine]]s, [[bomb]]s, [[trap]]s, and the fact that [[monster]]s can explode bombs and die in [[water]]. | '''Lesson 5''' is the fifth level in [[Chip's Challenge 1]]. This [[lesson level]] teaches [[Chip]] about more dangerous and difficult obstacles: [[clone machine]]s, [[bomb]]s, [[trap]]s, and the fact that [[monster]]s can explode bombs and die in [[water]]. | ||
Revision as of 04:33, 30 April 2020
Not to be confused with Lesson 5 (CC2 level).

| |
| Level set | Chip's Challenge 1 |
|---|---|
| Level number | 5 |
| Designer | Chuck Sommerville |
| Password | TQKB |
| Hint | The red button controls the clone machine. The brown button opens traps. |
| Chips | 0 required / 0 available |
| Time limit | 100 |
| MS (Scores) | |
| Bold time | 85 |
| Public time | 85 |
| Casual difficulty | ***** |
| Bold execution difficulty |
***** |
| Bold routing difficulty |
***** |
| Bold luck difficulty |
***** |
| Lynx (Scores) | |
| Bold time | 84 |
| Public time | 84 |
| Casual difficulty | ***** |
| Bold execution difficulty |
***** |
| Bold routing difficulty |
***** |
| Bold luck difficulty |
***** |
| Steam (Scores) | |
| Bold time | 84 |
| Public time | 84 |
| Casual difficulty | ***** |
| Bold execution difficulty |
***** |
| Bold routing difficulty |
***** |
| Bold luck difficulty |
***** |
Lesson 5 is the fifth level in Chip's Challenge 1. This lesson level teaches Chip about more dangerous and difficult obstacles: clone machines, bombs, traps, and the fact that monsters can explode bombs and die in water.
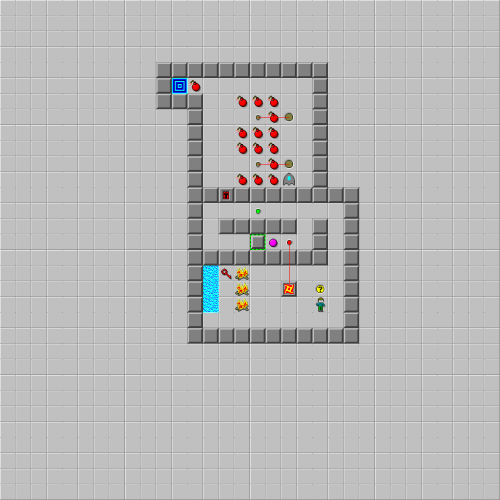
To complete the level, open the toggle wall above (it is possible to block the ball behind the toggle wall, but this is not necessary), run back to collect the red key (this would not be possible if fireballs were being cloned every [2]), open the red lock and hit both brown buttons in sequence, which will release the glider onto the bomb blocking the exit, exploding it. Chip can then exit.
Full level map
Walkthrough
| Previous Level | Current Level | Next Level |
|---|---|---|
| ← Lesson 4 | Lesson 5 | Lesson 6 → |
Categories:
- Chip's Challenge 1 Levels
- Levels designed by Chuck Sommerville
- Levels with casual difficulty 1 (MS)
- Levels with bold execution difficulty 1 (MS)
- Levels with bold routing difficulty 1 (MS)
- Levels with casual difficulty 1 (Lynx)
- Levels with bold execution difficulty 1 (Lynx)
- Levels with bold routing difficulty 1 (Lynx)
- Levels with casual difficulty 1 (Steam)
- Levels with bold execution difficulty 1 (Steam)
- Levels with bold routing difficulty 1 (Steam)
