Please create an account or Login! Have fun!
Madd Maze: Difference between revisions
imported>Ihavenoname248 No edit summary |
mNo edit summary |
||
| (10 intermediate revisions by 5 users not shown) | |||
| Line 1: | Line 1: | ||
{{Infobox Level | {{Infobox Level | ||
|pack = cclp2 | |||
| | |||
|level = 77 | |level = 77 | ||
| | |image = [[File:CCLP2 Level 77.png|300px]] | ||
|hint = Beware: This is both mad AND a maze. You have been WARNED! | |hint = Beware: This is both mad AND a maze. You have been WARNED! | ||
}} | |||
'''Madd Maze''' is the 77th level in [[Chip's Challenge Level Pack 2]]. While not a particularly difficult solve except for a belligerent [[clone machine]] full of [[glider]]s, Madd Maze is a "MA[)[) M@Z£", as it was originally titled, with several random elements that may leave the player "madd" by the end of the level. | |||
U-turn north, wait [1] for the formation to clear and take the [[yellow key]], then play into the [[force floor]]s and D, and if the second random force floor should take [[Chip]] D, take the key and move RUR, hope for >R and >U, and then force your way through the [[yellow lock]]. If Chip reaches the [[red lock]] underneath at 291.0 or 291.2, he can continue. The spare move in the latter case can be used in dodging the coming [[blob]]s. | |||
Take those chips, open the [[blue lock]] with the key, and slide to the glider clone machine. Remove the first two [[Computer chip|chips]], move [[block]] 1 to the water, then take the other three, splash block 3, and stop the gliders with block 2 before following the path down and right. Hold the north key, ''just'' sneaking past the bouncing [[pink ball]]s to collect the [[item]]s, and then continue to the right. | |||
Past the [[red lock]], move to the south, and move block 2 L and block 3 2U L to reach the [[suction boots]]. Use these to collect the chip in the [[fire]] area, then move towards the [[teleport]]. Chip needs to get in the teleport with fewer than [2] wasted, as an important [[monster]] rendezvous is coming. After teleporting, run to the right, collect the [[blue key]] and [[fire boots]], then return back under the teleport. Chip can use up to [2] waiting here, as a perfect run would still require him to wait [2] for the ball underneath. | |||
Take | Take the chips past this ball, and circle around the area to collect another six chips. Finally, open the [[blue lock]] and take the chip on the top and the ones near the [[exit]] before finishing the level. | ||
==Fix for Lynx== | |||
While Madd Maze is technically [[Lynx ruleset|Lynx]] compatible, the blue key in the blob room has a very high chance of being erased by a wandering blob. In [[Chip's Challenge Level Pack 2 (Lynx)|CCLXP2]], the blue key and lock were swapped for reds, and the red key in the random force floor room was also swapped for blue. | |||
==Full level map== | |||
[[File:Cclp2_full_map_level_77.png|500px]] | |||
== Walkthrough == | == Walkthrough == | ||
{{#ev:youtube|ox_4EYG3YSU}} | |||
{{Level Progression|Fire Bugs|The Search for the Exit}} | {{Level Progression|Fire Bugs|The Search for the Exit}} | ||
Latest revision as of 04:43, 30 April 2020

| |
| Level set | Chip's Challenge Level Pack 2 |
|---|---|
| Level number | 77 |
| Designer | Paul Hobden |
| Password | FHQW |
| Hint | Beware: This is both mad AND a maze. You have been WARNED! |
| Chips | 21 required / 21 available |
| Time limit | 300 |
| MS (Scores) | |
| Bold time | 244 |
| Public time | 244 |
| Casual difficulty | ***** |
| Bold execution difficulty |
***** |
| Bold routing difficulty |
***** |
| Bold luck difficulty |
***** |
| Lynx (Scores) | |
| Bold time | 240 |
| Public time | 240 |
| Casual difficulty | ***** |
| Bold execution difficulty |
***** |
| Bold routing difficulty |
***** |
| Bold luck difficulty |
***** |
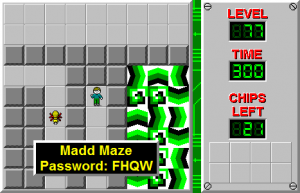
Madd Maze is the 77th level in Chip's Challenge Level Pack 2. While not a particularly difficult solve except for a belligerent clone machine full of gliders, Madd Maze is a "MA[)[) M@Z£", as it was originally titled, with several random elements that may leave the player "madd" by the end of the level.
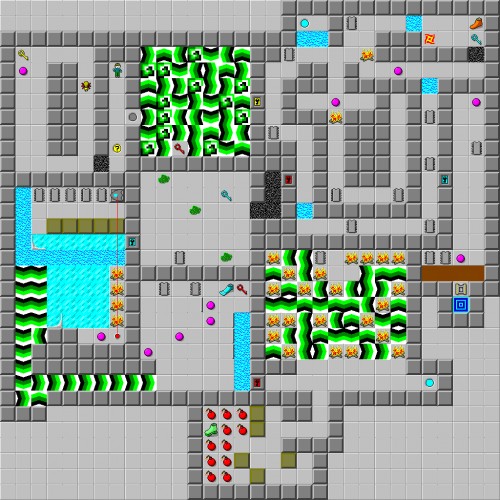
U-turn north, wait [1] for the formation to clear and take the yellow key, then play into the force floors and D, and if the second random force floor should take Chip D, take the key and move RUR, hope for >R and >U, and then force your way through the yellow lock. If Chip reaches the red lock underneath at 291.0 or 291.2, he can continue. The spare move in the latter case can be used in dodging the coming blobs.
Take those chips, open the blue lock with the key, and slide to the glider clone machine. Remove the first two chips, move block 1 to the water, then take the other three, splash block 3, and stop the gliders with block 2 before following the path down and right. Hold the north key, just sneaking past the bouncing pink balls to collect the items, and then continue to the right.
Past the red lock, move to the south, and move block 2 L and block 3 2U L to reach the suction boots. Use these to collect the chip in the fire area, then move towards the teleport. Chip needs to get in the teleport with fewer than [2] wasted, as an important monster rendezvous is coming. After teleporting, run to the right, collect the blue key and fire boots, then return back under the teleport. Chip can use up to [2] waiting here, as a perfect run would still require him to wait [2] for the ball underneath.
Take the chips past this ball, and circle around the area to collect another six chips. Finally, open the blue lock and take the chip on the top and the ones near the exit before finishing the level.
Fix for Lynx[edit]
While Madd Maze is technically Lynx compatible, the blue key in the blob room has a very high chance of being erased by a wandering blob. In CCLXP2, the blue key and lock were swapped for reds, and the red key in the random force floor room was also swapped for blue.
Full level map[edit]
Walkthrough[edit]
| Previous Level | Current Level | Next Level |
|---|---|---|
| ← Fire Bugs | Madd Maze | The Search for the Exit → |
- Chip's Challenge Level Pack 2 Levels
- Levels designed by Paul Hobden
- Levels with casual difficulty 2 (MS)
- Levels with bold execution difficulty 3 (MS)
- Levels with bold routing difficulty 3 (MS)
- Levels with luck rating 3 (MS)
- Levels with casual difficulty 2 (Lynx)
- Levels with bold execution difficulty 3 (Lynx)
- Levels with bold routing difficulty 3 (Lynx)
- Levels with luck rating 1 (Lynx)
