Please create an account or Login! Have fun!
Shattered: Difference between revisions
m ((via JWB)) |
mNo edit summary |
||
| (2 intermediate revisions by 2 users not shown) | |||
| Line 1: | Line 1: | ||
{{Infobox Level | {{Infobox Level | ||
| | |pack = cclp3 | ||
|level = 93 | |level = 93 | ||
| | |image = [[File:CCLP3 Level 93.png|300px]] | ||
}} | |||
| | |||
'''Shattered''' is the 93rd level in [[Chip's Challenge Level Pack 3]]. It was created by James Spriggs, and requires careful movement within very tight spaces to complete properly, as the time limit is strict. | '''Shattered''' is the 93rd level in [[Chip's Challenge Level Pack 3]]. It was created by [[James Spriggs]], and requires careful movement within very tight spaces to complete properly, as the time limit is strict. | ||
Hold down the [[brown button]], then circle around the east back to the [[ice skates]] and hit one [[green button]] twice to keep the [[blue key]] available. The [[blue lock]] can be passed after one more switch; beyond this, push block 1 eastwards and use the remaining block to reach the [[yellow lock]] with the appropriate [[key]]. Step off the [[force floor]] sideways and use another button to access the [[fire boots]] and [[yellow key]], and since collecting the latter switched the walls again, circle back through the toggle walls and then wend back through the start. | Hold down the [[brown button]], then circle around the east back to the [[ice skates]] and hit one [[green button]] twice to keep the [[blue key]] available. The [[blue lock]] can be passed after one more switch; beyond this, push block 1 eastwards and use the remaining block to reach the [[yellow lock]] with the appropriate [[key]]. Step off the [[force floor]] sideways and use another button to access the [[fire boots]] and [[yellow key]], and since collecting the latter switched the walls again, circle back through the toggle walls and then wend back through the start. | ||
| Line 19: | Line 11: | ||
Past the [[fire]] and [[ice]] is a [[teleport]] to the [[clone block]] west of the start, which accesses an ice room. Push block 2 L, the other blocks to the [[water]] and block 2 3U L. One more block is stopped by a [[green lock]], which then leads to R away from a [[recessed wall]] and then finally to another blue key. Open the second green lock to clone a block from the other clone block and create [[partial posting]], then pass the toggle maze below this and hit two buttons past the third green lock. Switch the walls one last time in the [[exit]] room to leave the last lock, and the exit, open. | Past the [[fire]] and [[ice]] is a [[teleport]] to the [[clone block]] west of the start, which accesses an ice room. Push block 2 L, the other blocks to the [[water]] and block 2 3U L. One more block is stopped by a [[green lock]], which then leads to R away from a [[recessed wall]] and then finally to another blue key. Open the second green lock to clone a block from the other clone block and create [[partial posting]], then pass the toggle maze below this and hit two buttons past the third green lock. Switch the walls one last time in the [[exit]] room to leave the last lock, and the exit, open. | ||
==Full level map== | == Full level map == | ||
[[ | [[File:Cclp3_full_map_level_93.png|500px]] | ||
== Walkthrough == | == Walkthrough == | ||
Latest revision as of 05:40, 30 April 2020

| |
| Level set | Chip's Challenge Level Pack 3 |
|---|---|
| Level number | 93 |
| Designer | James Spriggs |
| Password | YKFZ |
| Chips | 0 required / 0 available |
| Time limit | 95 |
| MS (Scores) | |
| Bold time | 39 |
| Public time | 39 |
| Casual difficulty | ***** |
| Bold execution difficulty |
***** |
| Bold routing difficulty |
***** |
| Bold luck difficulty |
***** |
| Lynx (Scores) | |
| Bold time | 31 |
| Public time | 31 |
| Casual difficulty | ***** |
| Bold execution difficulty |
***** |
| Bold routing difficulty |
***** |
| Bold luck difficulty |
***** |
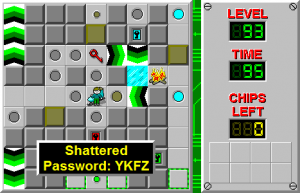
Shattered is the 93rd level in Chip's Challenge Level Pack 3. It was created by James Spriggs, and requires careful movement within very tight spaces to complete properly, as the time limit is strict.
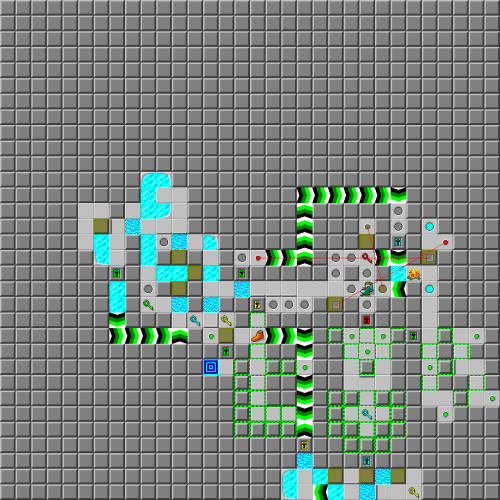
Hold down the brown button, then circle around the east back to the ice skates and hit one green button twice to keep the blue key available. The blue lock can be passed after one more switch; beyond this, push block 1 eastwards and use the remaining block to reach the yellow lock with the appropriate key. Step off the force floor sideways and use another button to access the fire boots and yellow key, and since collecting the latter switched the walls again, circle back through the toggle walls and then wend back through the start.
Past the fire and ice is a teleport to the clone block west of the start, which accesses an ice room. Push block 2 L, the other blocks to the water and block 2 3U L. One more block is stopped by a green lock, which then leads to R away from a recessed wall and then finally to another blue key. Open the second green lock to clone a block from the other clone block and create partial posting, then pass the toggle maze below this and hit two buttons past the third green lock. Switch the walls one last time in the exit room to leave the last lock, and the exit, open.
Full level map[edit]
Walkthrough[edit]
| Previous Level | Current Level | Next Level |
|---|---|---|
| ← Bolkonski | Shattered | Mistakes → |
- Chip's Challenge Level Pack 3 Levels
- Levels designed by James Spriggs
- Levels with casual difficulty 2 (MS)
- Levels with bold execution difficulty 2 (MS)
- Levels with bold routing difficulty 1 (MS)
- Levels with casual difficulty 2 (Lynx)
- Levels with bold execution difficulty 2 (Lynx)
- Levels with bold routing difficulty 1 (Lynx)
