Please create an account or Login! Have fun!
Chip Search: Difference between revisions
m (Conversion script moved page Chip Search to chip Search: Converting page titles to lowercase) |
No edit summary |
||
| (8 intermediate revisions by 5 users not shown) | |||
| Line 1: | Line 1: | ||
{{Infobox Level | {{Infobox Level | ||
|pack = cclp2 | |||
| | |||
|level = 74 | |level = 74 | ||
| | |image = [[File:CCLP2 Level 74.png|300px]] | ||
}} | }} | ||
'''Chip Search''' is the 74th level in [[Chip's Challenge Level Pack 2]]. | '''Chip Search''' is the 74th level in [[Chip's Challenge Level Pack 2]]. With a good dose of monsters in it and a lot of [[trap]]s and tricks around the items, Chip Search requires intelligent analysis of the booby trap patterns - and a bit of luck. | ||
Immediately step 2R and off the [[thief]], and take chip 5 ''only'' from the windmill; the safe chips are in a pattern, with the south edge and chips 5 and 8 untrapped. Go to the southwest, collect all the chips except the last one, which contains a trap with no [[brown button]] connection (otherwise Chip could safely take it, due to the rules of traps on the lower [[grid]] layer), and then return to the windmill. Collect chips 10 to 12, the [[suction boots]] and chip 8, then return to the ice pool, take the other chip and [[flippers]], and use them to reach the [[fire boots]] and four chips in the northwest. | Immediately step 2R and off the [[thief]], and take chip 5 ''only'' from the windmill; the safe chips are in a pattern, with the south edge and chips 5 and 8 untrapped. Go to the southwest, collect all the chips except the last one, which contains a trap with no [[brown button]] connection (otherwise Chip could safely take it, due to the rules of traps on the lower [[grid]] layer), and then return to the windmill. Collect chips 10 to 12, the [[suction boots]] and chip 8, then return to the ice pool, take the other chip and [[flippers]], and use them to reach the [[fire boots]] and four chips in the northwest. | ||
[[Teleport]] >D to the [[fire]] area, take the two currently available [[key]]s, then move >L and open the [[blue lock]], then the [[red lock]] and [[green lock]], and reverse backwards to take three chips underneath each of them. Continue to walk straight south into the [[tank]] room and walk, off the last patch of [[gravel]], 6D 3R 5D 4R 2D to the three chips, then venture 3L out and back to the teleport. Leap >U to the [[yellow key]], use it to collect the last chip, and then teleport south and keep holding to the [[exit]]. | [[Teleport]] >D to the [[fire]] area, take the two currently available [[key]]s, then move >L and open the [[blue lock]], then the [[red lock]] and [[green lock]], and reverse backwards to take three chips underneath each of them. Continue to walk straight south into the [[tank]] room and walk, off the last patch of [[gravel]], 6D 3R 5D 4R 2D to the three chips, then venture 3L out and back to the teleport. Leap >U to the [[yellow key]], use it to collect the last chip, and then teleport south and keep holding to the [[exit]]. | ||
==Fix for Lynx== | |||
[[CCLXP2]] fixes the following issues: | |||
*The [[chip]]s with [[trap]]s underneath them in the south-east have been replaced by [[block]]s with [[bomb]]s underneath them - the non-trapped chips are under blocks as well. | |||
*The chip with a trap underneath it in the south-west has been replaced by a mechanism which traps chip on a bear trap if the chip is approached. | |||
*The chips underneath the [[door]]s have been moved away from the tiles (two of the chips are now under blocks). | |||
*The blue and green [[key]]s have been swapped to stop the [[teeth]] from destroying the blue key. | |||
*The [[water]] underneath the [[bomb]]s near the exit has been removed. | |||
*The bombs underneath the [[socket]]s have been removed and placed in the adjacent vacant squares. | |||
==Full level map== | |||
[[File:Cclp2_full_map_level_74.png|500px]] | |||
== Walkthrough == | == Walkthrough == | ||
Latest revision as of 00:44, 4 May 2024

| |
| Level set | Chip's Challenge Level Pack 2 |
|---|---|
| Level number | 74 |
| Designer | Dave Borgman |
| Password | DJTP |
| Chips | 24 required / 32 available |
| Chips notes | 8 unsafe to reach |
| Time limit | 300 |
| MS (Scores) | |
| Bold time | 253 |
| Public time | 253 |
| Casual difficulty | ***** |
| Bold execution difficulty |
***** |
| Bold routing difficulty |
***** |
| Bold luck difficulty |
***** |
| Lynx (Scores) | |
| Bold time | 246 |
| Public time | 246 |
| Casual difficulty | ***** |
| Bold execution difficulty |
***** |
| Bold routing difficulty |
***** |
| Bold luck difficulty |
***** |
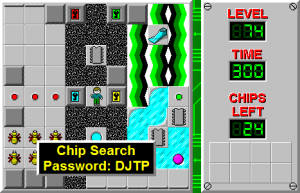
Chip Search is the 74th level in Chip's Challenge Level Pack 2. With a good dose of monsters in it and a lot of traps and tricks around the items, Chip Search requires intelligent analysis of the booby trap patterns - and a bit of luck.
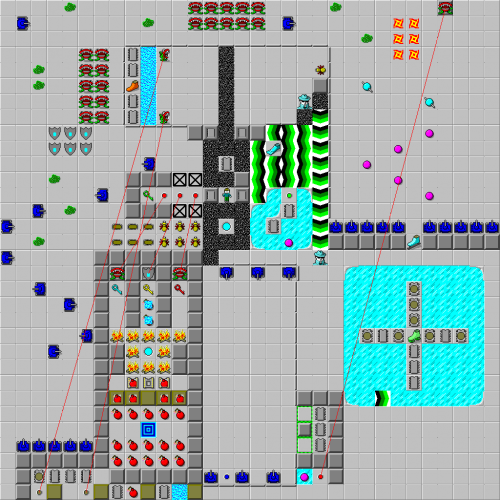
Immediately step 2R and off the thief, and take chip 5 only from the windmill; the safe chips are in a pattern, with the south edge and chips 5 and 8 untrapped. Go to the southwest, collect all the chips except the last one, which contains a trap with no brown button connection (otherwise Chip could safely take it, due to the rules of traps on the lower grid layer), and then return to the windmill. Collect chips 10 to 12, the suction boots and chip 8, then return to the ice pool, take the other chip and flippers, and use them to reach the fire boots and four chips in the northwest.
Teleport >D to the fire area, take the two currently available keys, then move >L and open the blue lock, then the red lock and green lock, and reverse backwards to take three chips underneath each of them. Continue to walk straight south into the tank room and walk, off the last patch of gravel, 6D 3R 5D 4R 2D to the three chips, then venture 3L out and back to the teleport. Leap >U to the yellow key, use it to collect the last chip, and then teleport south and keep holding to the exit.
Fix for Lynx[edit]
CCLXP2 fixes the following issues:
- The chips with traps underneath them in the south-east have been replaced by blocks with bombs underneath them - the non-trapped chips are under blocks as well.
- The chip with a trap underneath it in the south-west has been replaced by a mechanism which traps chip on a bear trap if the chip is approached.
- The chips underneath the doors have been moved away from the tiles (two of the chips are now under blocks).
- The blue and green keys have been swapped to stop the teeth from destroying the blue key.
- The water underneath the bombs near the exit has been removed.
- The bombs underneath the sockets have been removed and placed in the adjacent vacant squares.
Full level map[edit]
Walkthrough[edit]
| Previous Level | Current Level | Next Level |
|---|---|---|
| ← Bumble Boy | Chip Search | BuggyWall → |
- Chip's Challenge Level Pack 2 Levels
- Levels designed by Dave Borgman
- Levels with casual difficulty 2 (MS)
- Levels with bold execution difficulty 3 (MS)
- Levels with bold routing difficulty 2 (MS)
- Levels with casual difficulty 2 (Lynx)
- Levels with bold execution difficulty 1 (Lynx)
- Levels with bold routing difficulty 2 (Lynx)
- Levels unplayable in Lynx
