Please create an account or Login! Have fun!
Cloner's Maze: Difference between revisions
Tylersontag (talk | contribs) m (Tylersontag moved page cloner's Maze to Cloner's Maze over redirect: revert) |
mNo edit summary |
||
| (9 intermediate revisions by 5 users not shown) | |||
| Line 1: | Line 1: | ||
{{Infobox Level | {{Infobox Level | ||
|pack = cclp2 | |||
| | |||
|level = 147 | |level = 147 | ||
| | |image = [[File:CCLP2 Level 147.png|300px]] | ||
|hint = No fast maneuvers or split-second timing required here! Just use your brain. | |hint = No fast maneuvers or split-second timing required here! Just use your brain. | ||
}} | }} | ||
'''Cloner's Maze''' is the 147th level in [[Chip's Challenge Level Pack 2]]. It was designed by [[Eric Schmidt]] and is the third of five [[secret level]]s in CCLP2. As noted in the hint, there may not be any fast maneuvers or split-second timing required, but Cloner's Maze is nevertheless an excruciatingly hard puzzle at its hardest, though trivial in some cases and not too difficult in the early stages. | |||
'''Cloner's Maze''' is the 147th level in [[Chip's Challenge Level Pack 2]]. It is | |||
Maneuvering skills require sending [[monster]]s across changing landscapes into several [[bomb]]s, sticking monsters on [[trap]]s to deflect others, and using uncollected chips or even other monsters to deflect monsters into place. In fact, a split-second double-monster collision is used to provide a back-door entrance to the [[yellow key]]. The original solutions included cloning numerous [[glider]]s across the very top to eventually get the bombs open by brute force. | Maneuvering skills require sending [[monster]]s across changing landscapes into several [[bomb]]s, sticking monsters on [[trap]]s to deflect others, and using uncollected chips or even other monsters to deflect monsters into place. In fact, a split-second double-monster collision is used to provide a back-door entrance to the [[yellow key]]. The original solutions included cloning numerous [[glider]]s across the very top to eventually get the bombs open by brute force. | ||
| Line 30: | Line 14: | ||
In the MS solution, Chip must walk through a [[trap]] on a watery corner, but in Lynx this forces Chip to drown. Later, a [[fireball]] crosses over a [[blue key]] before destroying the [[bomb]] guarding it, so this too would not work in Lynx as the [[blue key]] is erased. However, since [[glider]]s are not destroyed by [[fire]] in Lynx, there are more opportunities for collisions, and the level is solvable by other means. The key differences are getting to the [[green key]] and the lower [[blue key]], which correspond to the problems described above. | In the MS solution, Chip must walk through a [[trap]] on a watery corner, but in Lynx this forces Chip to drown. Later, a [[fireball]] crosses over a [[blue key]] before destroying the [[bomb]] guarding it, so this too would not work in Lynx as the [[blue key]] is erased. However, since [[glider]]s are not destroyed by [[fire]] in Lynx, there are more opportunities for collisions, and the level is solvable by other means. The key differences are getting to the [[green key]] and the lower [[blue key]], which correspond to the problems described above. | ||
A simple method to reach the [[green key]] in Lynx from the start of the level is to first clone 16 [[glider]]s, destroying some [[bomb]]s and leaving a couple stuck in [[trap]]s. Then clone four more, but wait about [44] inbetween each so they don't collide in column 7. Now two of them will destroy the [[bomb]]s in the south-east corner, one is stuck in the [[trap]] at | A simple method to reach the [[green key]] in Lynx from the start of the level is to first clone 16 [[glider]]s, destroying some [[bomb]]s and leaving a couple stuck in [[trap]]s. Then clone four more, but wait about [44] inbetween each so they don't collide in column 7. Now two of them will destroy the [[bomb]]s in the south-east corner, one is stuck in the [[trap]] at (16, 14), and the last one makes its way around to destroy the [[bomb]] at (20, 3), granting Chip access to the corridor above. | ||
To destroy the [[bomb]] at | To destroy the [[bomb]] at (25, 26), first get a [[glider]] facing east into the [[trap]] at (17, 27), and then create a collision at (7, 24) that sends another [[glider]] to free that trap. Thus the red herring from MS helps Chip in Lynx. Note that you can also create a collision at (7, 21) that clones a [[fireball]] without needing the [[green key]]. | ||
Though the level is solvable in Lynx as it is, admittedly it is a considerably more complicated task. That being said, with careful planning and delicate timing, the optimal solution in Lynx is faster than in MS. | Though the level is solvable in Lynx as it is, admittedly it is a considerably more complicated task. That being said, with careful planning and delicate timing, the optimal solution in Lynx is faster than in MS. | ||
Alternately, you can edit the level so that the intended solution works. Simply remove the bothersome [[water]] tile, and switch the [[blue key]]s and [[blue lock]]s to their red counterparts. | Alternately, you can edit the level so that the intended solution works. Simply remove the bothersome [[water]] tile at (22, 3) and switch the [[blue key]]s and [[blue lock]]s to their red counterparts. | ||
==Full level map== | |||
[[File:Cclp2_full_map_level_147.png|500px]] | |||
== Walkthrough == | == Walkthrough == | ||
Latest revision as of 05:01, 30 April 2020

| |
| Level set | Chip's Challenge Level Pack 2 |
|---|---|
| Level number | 147 |
| Designer | Eric Schmidt |
| Password | IAQO |
| Hint | No fast maneuvers or split-second timing required here! Just use your brain. |
| Chips | 14 required / 14 available |
| Time limit | 999 |
| MS (Scores) | |
| Bold time | 789 |
| Public time | 781 |
| Casual difficulty | ***** |
| Bold execution difficulty |
***** |
| Bold routing difficulty |
***** |
| Bold luck difficulty |
***** |
| Lynx (Scores) | |
| Bold time | 889 |
| Public time | 889 |
| Casual difficulty | ***** |
| Bold execution difficulty |
***** |
| Bold routing difficulty |
***** |
| Bold luck difficulty |
***** |
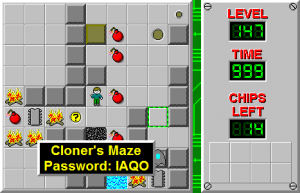
Cloner's Maze is the 147th level in Chip's Challenge Level Pack 2. It was designed by Eric Schmidt and is the third of five secret levels in CCLP2. As noted in the hint, there may not be any fast maneuvers or split-second timing required, but Cloner's Maze is nevertheless an excruciatingly hard puzzle at its hardest, though trivial in some cases and not too difficult in the early stages.
Maneuvering skills require sending monsters across changing landscapes into several bombs, sticking monsters on traps to deflect others, and using uncollected chips or even other monsters to deflect monsters into place. In fact, a split-second double-monster collision is used to provide a back-door entrance to the yellow key. The original solutions included cloning numerous gliders across the very top to eventually get the bombs open by brute force.
Cloner's Maze is the third of the three CCLP2 levels on which the bold route is unknown to everyone other than its single holder - the best public AVI and TWS solutions are 8 seconds short.
Lynx Solution[edit]
In the MS solution, Chip must walk through a trap on a watery corner, but in Lynx this forces Chip to drown. Later, a fireball crosses over a blue key before destroying the bomb guarding it, so this too would not work in Lynx as the blue key is erased. However, since gliders are not destroyed by fire in Lynx, there are more opportunities for collisions, and the level is solvable by other means. The key differences are getting to the green key and the lower blue key, which correspond to the problems described above.
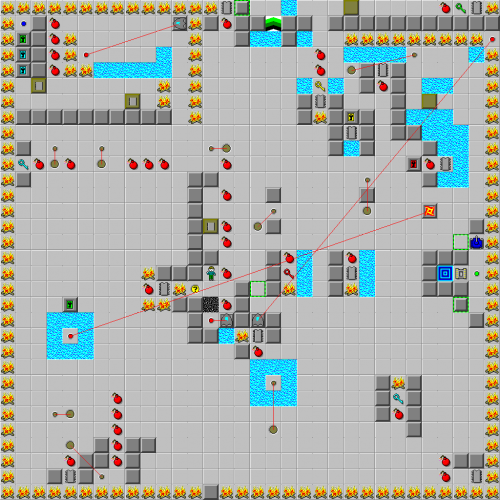
A simple method to reach the green key in Lynx from the start of the level is to first clone 16 gliders, destroying some bombs and leaving a couple stuck in traps. Then clone four more, but wait about [44] inbetween each so they don't collide in column 7. Now two of them will destroy the bombs in the south-east corner, one is stuck in the trap at (16, 14), and the last one makes its way around to destroy the bomb at (20, 3), granting Chip access to the corridor above.
To destroy the bomb at (25, 26), first get a glider facing east into the trap at (17, 27), and then create a collision at (7, 24) that sends another glider to free that trap. Thus the red herring from MS helps Chip in Lynx. Note that you can also create a collision at (7, 21) that clones a fireball without needing the green key.
Though the level is solvable in Lynx as it is, admittedly it is a considerably more complicated task. That being said, with careful planning and delicate timing, the optimal solution in Lynx is faster than in MS.
Alternately, you can edit the level so that the intended solution works. Simply remove the bothersome water tile at (22, 3) and switch the blue keys and blue locks to their red counterparts.
Full level map[edit]
Walkthrough[edit]
| Previous Level | Current Level | Next Level |
|---|---|---|
| ← Run-a-Muck | Cloner's Maze | Neptune → |
- Chip's Challenge Level Pack 2 Levels
- Levels designed by Eric Schmidt
- Levels with casual difficulty 5 (MS)
- Levels with bold execution difficulty 1 (MS)
- Levels with bold routing difficulty 5 (MS)
- Levels with casual difficulty 5 (Lynx)
- Levels with bold execution difficulty 4 (Lynx)
- Levels with bold routing difficulty 5 (Lynx)
- Levels quicker in Lynx than MS
