Please create an account or Login! Have fun!
Madness I: Difference between revisions
Tylersontag (talk | contribs) |
mNo edit summary |
||
| (7 intermediate revisions by 3 users not shown) | |||
| Line 1: | Line 1: | ||
{{Infobox Level | {{Infobox Level | ||
|pack = cclp2 | |||
| | |||
|level = 28 | |level = 28 | ||
| | |image = [[File:CCLP2 Level 28.png|300px]] | ||
| | |||
}} | }} | ||
'''Madness I''' is the 28th level in [[Chip's Challenge Level Pack 2]]. | '''Madness I''' is the 28th level in [[Chip's Challenge Level Pack 2]]. In [[Dave Borgman|Dave]]'s original set, ''DaveB1'', it was named ''More Madness'', as the order of [[Madness II]] and it was reversed in the set. Unlike that level, Madness I is not difficult at all, and the only significant puzzle is that of figuring out a [[partial posting|partial post]] to reach the exit. | ||
To complete it, take the chips across the top, then the chip from the [[paramecium]] area on the top, and go downwards to collect a second chip. Finish with the one to the right and the lowest chip, then play down to steal ''one'' chip from the [[bug]]s. Now, play to the southeast corner and collect the final two pairs of chips, arriving to the southwest. From here, sneak into the beehive and collect the final two chips, then move 3R U specifically to escape without having to wait. | To complete it, take the chips across the top, then the chip from the [[paramecium]] area on the top, and go downwards to collect a second chip. Finish with the one to the right and the lowest chip, then play down to steal ''one'' chip from the [[bug]]s. Now, play to the southeast corner and collect the final two pairs of chips, arriving to the southwest. From here, sneak into the beehive and collect the final two chips, then move 3R U specifically to escape without having to wait. | ||
| Line 27: | Line 11: | ||
In the four corners were four [[red button]]s, which cloned [[block]]s onto four [[brown button]]s to allow these four blocks to escape the [[trap]]s; move blocks 3 and 1 into the [[bomb]]s, block 4 UR, and block 2 west into the [[teleport]], which causes a partial post and allows Chip to exit. | In the four corners were four [[red button]]s, which cloned [[block]]s onto four [[brown button]]s to allow these four blocks to escape the [[trap]]s; move blocks 3 and 1 into the [[bomb]]s, block 4 UR, and block 2 west into the [[teleport]], which causes a partial post and allows Chip to exit. | ||
== Fix for [[Lynx]] | == Fix for Lynx == | ||
In [[Chip's Challenge Level Pack 2 (Lynx)|CCLXP2]], the ice tiles underneath the chips in the corners were removed and recessed walls were placed adjacent to them. In addition, the blocks on traps behind the sockets slide out automatically when their respective buttons are hit; to counteract this, the CCLXP2 staff placed clone blocks facing towards each other on the traps. This makes Madness I the first level in CCLXP2 that ''cannot'' be solved in MS; hence, ''LX'' is appended to the title to indicate a Lynx-only level. | |||
A [[hint]] was also added under the starting point reading:<br> | |||
''The blocks below are on traps and moving against each other. Be careful how you deal with them!'' | |||
==Full level map== | |||
[[File:Cclp2_full_map_level_28.png|500px]] | |||
== Walkthrough == | == Walkthrough == | ||
Latest revision as of 04:31, 30 April 2020

| |
| Level set | Chip's Challenge Level Pack 2 |
|---|---|
| Level number | 28 |
| Designer | Dave Borgman |
| Password | ULJD |
| Chips | 15 required / 15 available |
| Time limit | 300 |
| MS (Scores) | |
| Bold time | 266 |
| Public time | 266 |
| Casual difficulty | ***** |
| Bold execution difficulty |
***** |
| Bold routing difficulty |
***** |
| Bold luck difficulty |
***** |
| Lynx (Scores) | |
| Bold time | 268 |
| Public time | 268 |
| Casual difficulty | ***** |
| Bold execution difficulty |
***** |
| Bold routing difficulty |
***** |
| Bold luck difficulty |
***** |
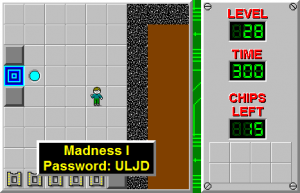
Madness I is the 28th level in Chip's Challenge Level Pack 2. In Dave's original set, DaveB1, it was named More Madness, as the order of Madness II and it was reversed in the set. Unlike that level, Madness I is not difficult at all, and the only significant puzzle is that of figuring out a partial post to reach the exit.
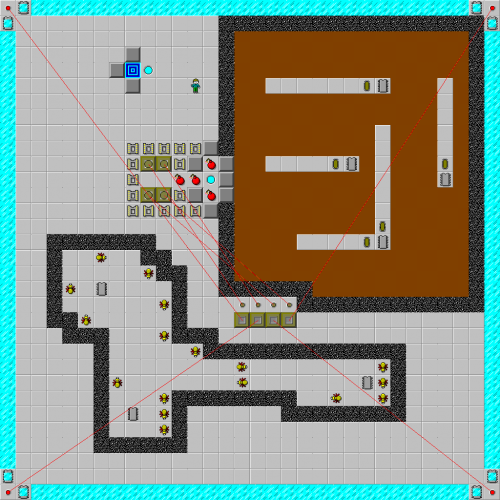
To complete it, take the chips across the top, then the chip from the paramecium area on the top, and go downwards to collect a second chip. Finish with the one to the right and the lowest chip, then play down to steal one chip from the bugs. Now, play to the southeast corner and collect the final two pairs of chips, arriving to the southwest. From here, sneak into the beehive and collect the final two chips, then move 3R U specifically to escape without having to wait.
In the four corners were four red buttons, which cloned blocks onto four brown buttons to allow these four blocks to escape the traps; move blocks 3 and 1 into the bombs, block 4 UR, and block 2 west into the teleport, which causes a partial post and allows Chip to exit.
Fix for Lynx[edit]
In CCLXP2, the ice tiles underneath the chips in the corners were removed and recessed walls were placed adjacent to them. In addition, the blocks on traps behind the sockets slide out automatically when their respective buttons are hit; to counteract this, the CCLXP2 staff placed clone blocks facing towards each other on the traps. This makes Madness I the first level in CCLXP2 that cannot be solved in MS; hence, LX is appended to the title to indicate a Lynx-only level.
A hint was also added under the starting point reading:
The blocks below are on traps and moving against each other. Be careful how you deal with them!
Full level map[edit]
Walkthrough[edit]
| Previous Level | Current Level | Next Level |
|---|---|---|
| ← Frozen Floors | Madness I | Fire and Water → |
- Chip's Challenge Level Pack 2 Levels
- Levels designed by Dave Borgman
- Levels with casual difficulty 1 (MS)
- Levels with bold execution difficulty 1 (MS)
- Levels with bold routing difficulty 2 (MS)
- Levels with casual difficulty 1 (Lynx)
- Levels with bold execution difficulty 1 (Lynx)
- Levels with bold routing difficulty 2 (Lynx)
- Levels unplayable in Lynx
