Please create an account or Login! Have fun!
Exit Chip: Difference between revisions
m (spacing) |
No edit summary |
||
| (One intermediate revision by one other user not shown) | |||
| Line 3: | Line 3: | ||
|level = 93 | |level = 93 | ||
|image = [[File:CCLP2 Level 93.png|300px]] | |image = [[File:CCLP2 Level 93.png|300px]] | ||
}}'''Exit Chip''' is the 93rd level in [[Chip's Challenge Level Pack 2]]. In the original set, the [[hint]] boasted that this level would ''never'' be solved, at least without a [[level editor]]. Its claim is backed up; the endless booby traps and hidden [[item]]s make Exit Chip a struggle in controlling frustration, and a puzzle that some say might be ''too'' hard. | }} | ||
'''Exit Chip''' is the 93rd level in [[Chip's Challenge Level Pack 2]]. In the original set, the [[hint]] boasted that this level would ''never'' be solved, at least without a [[level editor]]. Its claim is backed up; the endless booby traps and hidden [[item]]s make Exit Chip a struggle in controlling frustration, and a puzzle that some say might be ''too'' hard. | |||
Take the [[Computer chip|chip]] hidden in the corner near [[Chip]], then hidden along the very bottom edge, and then the one hidden in the far northwest corner, followed by the [[flippers]] in the northeast corner. Chip can now play through the central corridor, exposing a [[bomb]] and four [[lock]]s, removing the [[socket]] under the block, and revealing a [[water]] space which Chip can fortunately swim through as he pushes the block. | Take the [[Computer chip|chip]] hidden in the corner near [[Chip]], then hidden along the very bottom edge, and then the one hidden in the far northwest corner, followed by the [[flippers]] in the northeast corner. Chip can now play through the central corridor, exposing a [[bomb]] and four [[lock]]s, removing the [[socket]] under the block, and revealing a [[water]] space which Chip can fortunately swim through as he pushes the block. | ||
| Line 10: | Line 12: | ||
Return back to the ball chamber at the bottom, then reveal the hidden [[block]] on the top edge of the alcove to the left and use it to return to the center. Now, pass the single bouncing ball, go through the open passageway which then reveals a [[wall]], and take what ends up being the four [[key]]s in the passageways with the [[force floor]]s. Now, remove the water and locks, and then move past the first set of pink balls and take another hidden block from near the water space to explode the bomb. Go back to the very start and walk over the force floor into the buried [[exit]]. | Return back to the ball chamber at the bottom, then reveal the hidden [[block]] on the top edge of the alcove to the left and use it to return to the center. Now, pass the single bouncing ball, go through the open passageway which then reveals a [[wall]], and take what ends up being the four [[key]]s in the passageways with the [[force floor]]s. Now, remove the water and locks, and then move past the first set of pink balls and take another hidden block from near the water space to explode the bomb. Go back to the very start and walk over the force floor into the buried [[exit]]. | ||
==Fix for Lynx== | |||
For [[CCLXP2]], the following changes were made: | |||
*The buried [[chip]]s and [[flippers]] were moved to the upper layer or placed under [[block]]s. | |||
*[[Invisible wall]]s were added in the starting area. | |||
*The [[exit]] was placed under a block. | |||
*The buried [[fire]] leading to the exit was moved to the upper layer, and the [[blue wall]] replaced with a west-pointing [[force floor]]. | |||
*The buried [[hidden wall]]s and the floor at [29, 16] were replaced with [[recessed wall]]s, with the square to the right of the unsafe chip replaced by a hidden wall. | |||
*The hidden [[door]]s near the [[socket]] were moved to the upper layer, with a recessed wall path added to allow access to the eastern area. | |||
*The block that was covering the socket is now covering the adjacent [[water]] tile. | |||
*The hidden [[key]]s were placed under blocks. | |||
*The hidden blocks were replaced with [[clone machine]]s. | |||
*The hidden [[thin wall]] was replaced with a [[trap]] that is initially held open but closed at the end of the path. | |||
*The hidden trap at [29, 22] was replaced with a [[bomb]] under a block, which can be pushed into the neighbouring squares. | |||
*The hidden [[suction boots]] were placed under a block surrounded by force floors. | |||
== Trivia == | == Trivia == | ||
Latest revision as of 00:06, 5 May 2024

| |
| Level set | Chip's Challenge Level Pack 2 |
|---|---|
| Level number | 93 |
| Designer | Eric Schmidt |
| Password | WJNL |
| Chips | 3 required / 5 available |
| Chips notes | 1 unsafe to reach |
| Time limit | 500 |
| MS (Scores) | |
| Bold time | 388 |
| Public time | 388 |
| Casual difficulty | ***** |
| Bold execution difficulty |
***** |
| Bold routing difficulty |
***** |
| Bold luck difficulty |
***** |
| Lynx (Scores) | |
| Bold time | 387 |
| Public time | 386 |
| Casual difficulty | ***** |
| Bold execution difficulty |
***** |
| Bold routing difficulty |
***** |
| Bold luck difficulty |
***** |
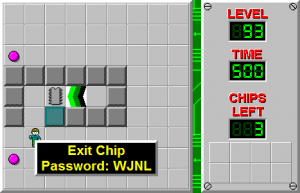
Exit Chip is the 93rd level in Chip's Challenge Level Pack 2. In the original set, the hint boasted that this level would never be solved, at least without a level editor. Its claim is backed up; the endless booby traps and hidden items make Exit Chip a struggle in controlling frustration, and a puzzle that some say might be too hard.
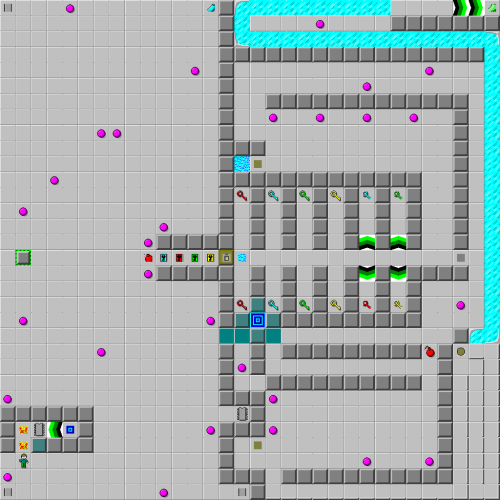
Take the chip hidden in the corner near Chip, then hidden along the very bottom edge, and then the one hidden in the far northwest corner, followed by the flippers in the northeast corner. Chip can now play through the central corridor, exposing a bomb and four locks, removing the socket under the block, and revealing a water space which Chip can fortunately swim through as he pushes the block.
Pass the six inverse corridors, then turn north, wend through the continuing barrages of pink balls to the very south, and then to the southeast corner. Use the long way to avoid a hidden trap, then wait [1/2] for this ball and take off to the northeast corner, which contains suction boots.
Return back to the ball chamber at the bottom, then reveal the hidden block on the top edge of the alcove to the left and use it to return to the center. Now, pass the single bouncing ball, go through the open passageway which then reveals a wall, and take what ends up being the four keys in the passageways with the force floors. Now, remove the water and locks, and then move past the first set of pink balls and take another hidden block from near the water space to explode the bomb. Go back to the very start and walk over the force floor into the buried exit.
Fix for Lynx[edit]
For CCLXP2, the following changes were made:
- The buried chips and flippers were moved to the upper layer or placed under blocks.
- Invisible walls were added in the starting area.
- The exit was placed under a block.
- The buried fire leading to the exit was moved to the upper layer, and the blue wall replaced with a west-pointing force floor.
- The buried hidden walls and the floor at [29, 16] were replaced with recessed walls, with the square to the right of the unsafe chip replaced by a hidden wall.
- The hidden doors near the socket were moved to the upper layer, with a recessed wall path added to allow access to the eastern area.
- The block that was covering the socket is now covering the adjacent water tile.
- The hidden keys were placed under blocks.
- The hidden blocks were replaced with clone machines.
- The hidden thin wall was replaced with a trap that is initially held open but closed at the end of the path.
- The hidden trap at [29, 22] was replaced with a bomb under a block, which can be pushed into the neighbouring squares.
- The hidden suction boots were placed under a block surrounded by force floors.
Trivia[edit]
- Out of all the 149 levels voted into CCLP2, Exit Chip was rated lowest on "Fun" during voting, likely due to blind timing on the ice slide.
Full level map[edit]
Walkthrough[edit]
| Previous Level | Current Level | Next Level |
|---|---|---|
| ← Abandoned Mines | Exit Chip | Checkerboard II → |
- Chip's Challenge Level Pack 2 Levels
- Levels designed by Eric Schmidt
- Levels with casual difficulty 4 (MS)
- Levels with bold execution difficulty 1 (MS)
- Levels with bold routing difficulty 2 (MS)
- Levels with casual difficulty 4 (Lynx)
- Levels with bold execution difficulty 1 (Lynx)
- Levels with bold routing difficulty 2 (Lynx)
- Levels unplayable in Lynx
